AWSマネジメントコンソールの操作を記録して再現コードやCloudFormationテンプレート、Terraform定義を生成してくれるブラウザ拡張 – Console Recorder for AWS
この記事は公開されてから1年以上経過しています。情報が古い可能性がありますので、ご注意ください。
こんにちは。
ブラウザ拡張大好きなshoitoです。
AWS環境を構築していて、こんなことありませんか?
- AWSマネジメントコンソールから何度もポチポチ環境構築していて面倒
- CloudFormationやTerraformで自動化したいけど、定義ファイルをイチから作るのが面倒
- Python, JavaScript, GoでAWS SDKを使ってAWSリソースを操作したいけど、都度APIを調べるのが面倒。イチから実装するのが面倒
- ...働くのが面倒
Chrome/Firefoxのブラウザ拡張「Console Recorder for AWS」がそんな課題を少しでも和らげてくれそうです。
ちなみに、こちらのツイートでConsole Recorder for AWSを知りました。
#AWS Console recorder extension for Firefox. Click in the console, get Python/Javascript code and a Cloudformation template ??? https://t.co/p3aFU0efbC pic.twitter.com/cCfeE8b4KN
— Julien Simon (@julsimon) December 20, 2018
このツールは、AWSマネジメントコンソールの操作を記録し、それを再現するコードとCLI、SDKコマンド、CloudFormation/Terraformテンプレートを出力してくれます。
※まだベータ版なようなので、期待通り動かない部分もあるかもしれません
※2018-12-22 追記 AWSチーフエバンジェリスト Jeff Barrのリアクション
Looks cool - Console Recorder for #AWS - https://t.co/0hY4D3e5Mf - Clickety, click-click in AWS Management Console, get a CloudFormation template as a reward! pic.twitter.com/NyuOlUIZGV
— Jeff Barr ☁️ (@jeffbarr) December 21, 2018
使い方
ブラウザにGoogle Chromeをお使いの人はChromeウェブストアから、Firefoxの人はFirefoxアドオンからインストールしてください。
あとはAWSマネジメントコンソールを開き、Console Recorderのアイコンをクリックし、Start Recordingボタンを押下し、操作の記録を開始します。

例として、EC2インスタンスを作成する操作を記録してみました。
操作の記録を終了したい場合は再度Console Recorderのアイコンをクリックし、Stop Recordingボタンを押下します。

ここまでで、以下のコードやスクリプトが生成されます。
- Boto3(Python) SDK
- AWS CLI(v1)
- JavaScript SDK
- Go SDK(v1)
- CloudFormation
- Terraform
- CDK(TypeScript)
成果物を見てみる
EC2インスタンスを作成する操作を記録してみたので、いくつか成果物を見てみます。
ダッシュボードはこんな感じです。
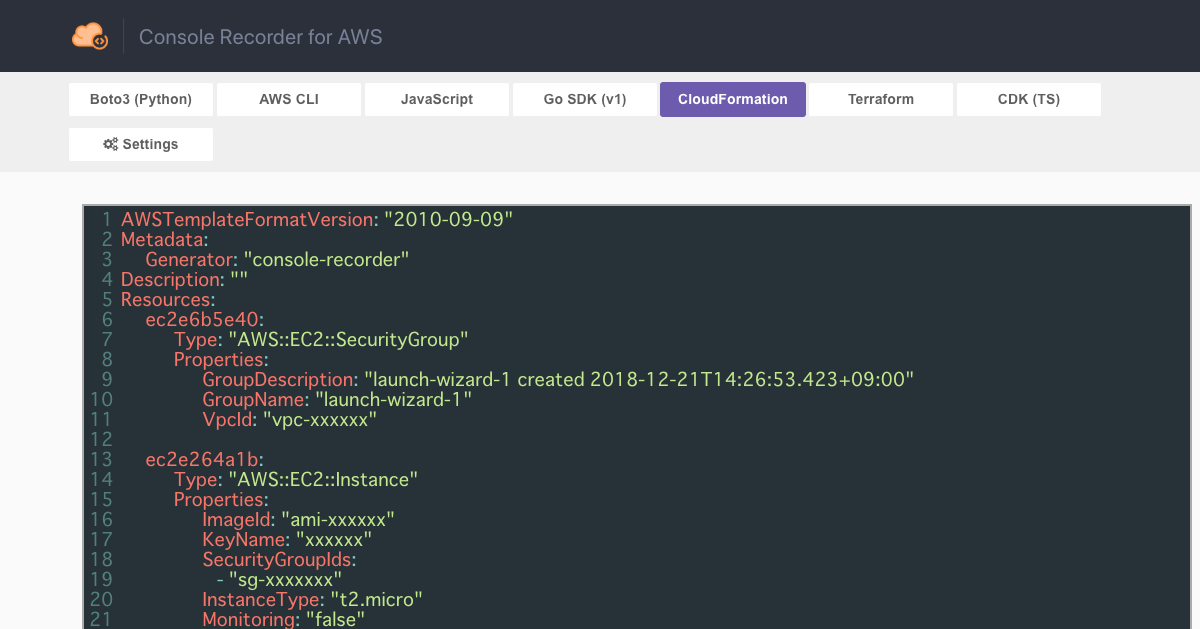
まずは生成されたCloudFormationテンプレート(各種IDはxxxxxxに置き換え)です。
AWSTemplateFormatVersion: "2010-09-09"
Metadata:
    Generator: "console-recorder"
Description: ""
Resources:
    ec2e6b5e40:
        Type: "AWS::EC2::SecurityGroup"
        Properties:
            GroupDescription: "launch-wizard-1 created 2018-12-21T14:26:53.423+09:00"
            GroupName: "launch-wizard-1"
            VpcId: "vpc-xxxxxx"

    ec2e264a1b:
        Type: "AWS::EC2::Instance"
        Properties:
            ImageId: "ami-xxxxxx"
            KeyName: "xxxxxx"
            SecurityGroupIds:
              - "sg-xxxxxx"
            InstanceType: "t2.micro"
            Monitoring: "false"
            DisableApiTermination: "false"
            CreditSpecification:
                CPUCredits: "standard"
            Tags:
              -
                ResourceType: "instance"
                Tag:
                  -
                    Key: "env"
                    Value: "dev"
              -
                ResourceType: "volume"
                Tag:
                  -
                    Key: "env"
                    Value: "dev"
            EbsOptimized: "false"
            BlockDeviceMappings:
              -
                DeviceName: "/dev/xvda"
                Ebs:
                    VolumeSize: 8
                    DeleteOnTermination: "true"
                    VolumeType: "gp2"
それっぽくできてますね。
次はTerraformファイル(各種IDはxxxxxxに置き換え)です。
# https://www.terraform.io/downloads.html

provider "aws" {
    region = "ap-northeast-1"
}

resource "aws_security_group" "ec2e6b5e40" {
    description = "launch-wizard-1 created 2018-12-21T14:26:53.423+09:00"
    name = "launch-wizard-1"
    vpc_id = "vpc-xxxxxx"
}

resource "aws_instance" "ec2e264a1b" {
    ami = "ami-xxxxxx"
    key_name = "xxxxxx"
    vpc_security_group_ids = [
        "sg-xxxxxx"
    ]
    instance_type = "t2.micro"
    monitoring {
        enabled = false
    }
    disable_api_termination = false
    credit_specification {
        cpu_credits = "standard"
    }
    tags {
        env = "dev"
    }
    ebs_optimized = false
    root_block_device {
        volume_type = "gp2"
        volume_size = 8
        delete_on_termination = true
    }
}
次はBoto3(Python) SDKを使うコード(各種IDはxxxxxxに置き換え)です。
# pip install boto3

import boto3

ec2_client = boto3.client('ec2', region_name='ap-northeast-1')

response = ec2_client.describe_availability_zones()
response = ec2_client.describe_launch_templates()
response = ec2_client.describe_images(
    Owner=[
        'self'
    ],
    Filter=[
        {
            Name='ImageState',
            Values=[
                'available'
            ]
        }
    ],
    MaxResults=50
)
response = ec2_client.describe_images(
    MaxResults=50
)
response = ec2_client.describe_images(
    MaxResults=1
)
response = ec2_client.describe_vpcs()
response = ec2_client.describe_subnets()
response = ec2_client.describe_security_groups()
response = ec2_client.describe_security_groups()
response = ec2_client.describe_tags(
    Filter=[
        {
            Name='key',
            Values=[
                'e'
            ]
        }
    ]
)
response = ec2_client.describe_tags(
    Filter=[
        {
            Name='key',
            Values=[
                'en'
            ]
        }
    ]
)
response = ec2_client.describe_tags(
    Filter=[
        {
            Name='key',
            Values=[
                'env'
            ]
        }
    ]
)
response = ec2_client.describe_tags(
    Filter=[
        {
            Name='value',
            Values=[
                'd'
            ]
        }
    ]
)
response = ec2_client.describe_tags(
    Filter=[
        {
            Name='value',
            Values=[
                'de'
            ]
        }
    ]
)
response = ec2_client.describe_tags(
    Filter=[
        {
            Name='value',
            Values=[
                'dev'
            ]
        }
    ]
)
response = ec2_client.describe_key_pairs()
response = ec2_client.create_security_group(
    GroupDescription='launch-wizard-1 created 2018-12-21T14:26:53.423+09:00',
    GroupName='launch-wizard-1',
    VpcId='vpc-xxxxxx'
)
response = ec2_client.describe_security_groups()
response = ec2_client.run_instances(
    ImageId='ami-xxxxxx',
    MaxCount=1,
    MinCount=1,
    KeyName='xxxxxx',
    SecurityGroupId=[
        'sg-xxxxxx'
    ],
    InstanceType='t2.micro',
    Monitoring={
        Enabled=False
    },
    DisableApiTermination=False,
    CreditSpecification={
        CpuCredits='standard'
    },
    TagSpecification=[
        {
            ResourceType='instance',
            Tag=[
                {
                    Key='env',
                    Value='dev'
                }
            ]
        },
        {
            ResourceType='volume',
            Tag=[
                {
                    Key='env',
                    Value='dev'
                }
            ]
        }
    ],
    EbsOptimized=False,
    BlockDeviceMapping=[
        {
            DeviceName='/dev/xvda',
            Ebs={
                VolumeSize=8,
                DeleteOnTermination=True,
                VolumeType='gp2'
            }
        }
    ]
)
...
(略)
SDKを使ったコードの方は、AWSマネジメントコンソールへのAPI呼び出しをキャプチャしている(?)ためか、タグの入力を1文字ずつ再現しちゃってますね。
ここは余計なコードを省くなど整形が必要そうです。
さいごに
CloudFormationやTerraformの方はリソース名を変えてあげれば、それっぽいテンプレートになりそうです。
SDKを使ったコードやCLIコマンドは必要な操作毎に、Start RecordingとStop Recordingをするとノイズが少ないですね。
イチから自分で実装していくよりもベースとなるコードを生成してくれるため、手間は減りそうです。インストールは簡単なので、試してみてはいかがでしょうか?


