Cloud Vision APIをLambdaで使って、手書き文字(日本語)のOCRをやってみた
この記事は公開されてから1年以上経過しています。情報が古い可能性がありますので、ご注意ください。
GCPのCloud Vision APIを使って、手書き文字のOCRを行ってみました。 せっかくなので、S3に画像ファイルを置いたらLambdaを起動し、そのLambdaでOCRを行う仕組みを作ります。

おすすめの方
- S3にオブジェクトを置くと、SNSトピックを発行する方法を知りたい方
- LambdaでGCPのCloud Vision APIを使ってみたい方
GCPのプロジェクトを作成する
こちらにアクセスして、プロジェクトの設定を行います。 GCPコンソールからプロジェクト作成を行ってもOKです。

そのままCloud Vision APIを有効にします。

続いてJSONのプライベートキーをダウンロードしておきます。

サーバーレスアプリを作成する
SAM Init
sam init \
    --runtime python3.7 \
    --name GCP-OCR-Sample \
    --app-template hello-world
Visionクライアントライブラリを使う
GCPのVisionクライアントライブラリを使うため、requirements.txtに記載します。
google-cloud-vision
認証情報JSONファイルを格納する
GCPのプロジェクト作成時にダウンロードした認証情報(JSONファイル)をLambdaハンドラーと同じ場所に格納します。
├── hello_world
│   ├── __init__.py
│   ├── app.py
│   ├── gcp.json
│   └── requirements.txt
└── template.yaml
SAMテンプレートファイル
認証情報(JSONファイル)のファイル位置をLambdaの環境変数で設定しています。また、S3バケットに対して、SNSトピックをPublishする権限を与える必要があります。
AWSTemplateFormatVersion: '2010-09-09'
Transform: AWS::Serverless-2016-10-31
Description: GCP-OCR-Sample

Resources:
  ImageBucket:
    DeletionPolicy: Retain
    Type: AWS::S3::Bucket
    Properties:
      BucketName: cm-fujii-genki-ocr-sample-bucket
      NotificationConfiguration:
        TopicConfigurations:
          - Event: s3:ObjectCreated:*
            Topic: !Ref OcrNotifyTopic

  OcrNotifyTopic:
    Type: AWS::SNS::Topic

  OcrNotifyTopicPolicy:
    Type: AWS::SNS::TopicPolicy
    Properties:
      Topics:
        - !Ref OcrNotifyTopic
      PolicyDocument:
        Id: !Ref OcrNotifyTopic
        Version: 2012-10-17
        Statement:
          - Effect: Allow
            Principal:
              Service: s3.amazonaws.com
            Action: SNS:Publish
            Resource: !Ref OcrNotifyTopic
            Condition:
              ArnLike:
                aws:SourceArn: arn:aws:s3:::cm-fujii-genki-ocr-sample-bucket

  OcrSampleFunction:
    Type: AWS::Serverless::Function
    Properties:
      CodeUri: hello_world/
      Handler: app.lambda_handler
      Runtime: python3.7
      Timeout: 30
      Policies:
        - arn:aws:iam::aws:policy/AmazonS3ReadOnlyAccess
      Environment:
        Variables:
          GOOGLE_APPLICATION_CREDENTIALS: gcp.json
      Events:
        S3Event:
          Type: SNS
          Properties:
            Topic: !Ref OcrNotifyTopic

  OcrSampleFunctionLogGroup:
    Type: AWS::Logs::LogGroup
    Properties:
      LogGroupName: !Sub /aws/lambda/${OcrSampleFunction}
Lambdaコード
コード自体は公式ドキュメントの内容です。
import json

import boto3

s3 = boto3.client('s3')

def lambda_handler(event, context):
    message = json.loads(event['Records'][0]['Sns']['Message'])
    s3_event = message['Records'][0]['s3']

    bucket_name = s3_event['bucket']['name']
    key_name = s3_event['object']['key']

    print(f'target: {bucket_name}, {key_name}')

    body = s3.get_object(Bucket=bucket_name, Key=key_name)['Body'].read()

    detect_document(body)

def detect_document(body):
    # https://cloud.google.com/vision/docs/handwriting
    from google.cloud import vision
    client = vision.ImageAnnotatorClient()
    image = vision.Image(content=body)

    response = client.document_text_detection(
        image=image,
        image_context={'language_hints': ['ja']}
    )

    for page in response.full_text_annotation.pages:
        for block in page.blocks:
            print('+ Block confidence: {}\n'.format(block.confidence))

            for paragraph in block.paragraphs:
                print('-- Paragraph confidence: {}'.format(
                    paragraph.confidence))

                for word in paragraph.words:
                    word_text = ''.join([
                        symbol.text for symbol in word.symbols
                    ])
                    print('**** Word text: {} (confidence: {})'.format(
                        word_text, word.confidence))

                    for symbol in word.symbols:
                        print('>>>>>> Symbol: {} (confidence: {})'.format(
                            symbol.text, symbol.confidence))

    if response.error.message:
        raise Exception(
            '{}\nFor more info on error messages, check: '
            'https://cloud.google.com/apis/design/errors'.format(
                response.error.message))
なお、日本語ドキュメントだと、下記のようにtypesの記載がありますが、ライブラリの更新によって不要になりました。
image = vision.types.Image(content=content)
このまま使うとエラーが発生するため、英語ドキュメントを参考にし、下記のように使っています。
image = vision.Image(content=content)
デプロイ
sam build --use-container

sam package \
    --output-template-file packaged.yaml \
    --s3-bucket cm-fujii.genki-deploy

sam deploy \
    --template-file packaged.yaml \
    --stack-name GCP-OCR-Sample-Stack \
    --capabilities CAPABILITY_NAMED_IAM \
    --no-fail-on-empty-changeset
さっそく動かしてOCRをする
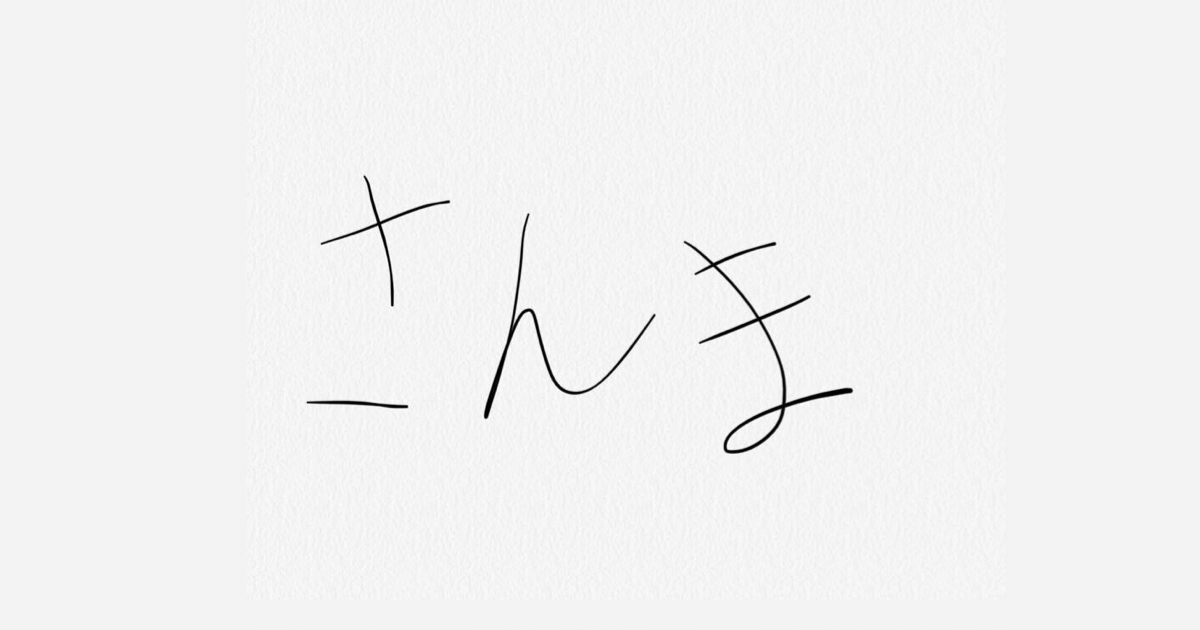
用意した手書き画像
iPhoneのメモアプリで手書きし、4種類の画像を用意しました。


OCR結果
S3バケットに置くとLambdaが実行されます。その際のCloudWatch Logsの内容が下記となります。
Blockの中にParagraph要素があり、その中にWordのSymbolがあります。このあたりは上記にあるソースコードを見ると分かりやすいです。プログラムで扱う際は、やりたいことに合わせてBlock・Paragraph・Word(Symbol)の関係性を強く意識する必要がありますね。(1画像=1単語と決まっているのか、など)


レスポンス全体については、公式ドキュメントにある「REST APIのResponse」が参考になります。
Lambda実行時間について
Lambdaのメモリ割当量を変更して試したところ、初回実行の時間に大きな差が出ました。ライブラリの初期化等でしょうか。
メモリ割当: 128 MB
| 回数 | 実行時間 | 画像種類 |
|---|---|---|
| 1回目 | 約14秒(Lambda初期化は約500ms) | さんま |
| 2回目 | 約2.8秒 | さんま |
| 3回目 | 約2.7秒 | さんま |
| 4回目 | 約3.0秒 | 補完計画 |
メモリ割当: 3008 MB
| 回数 | 実行時間 | 画像種類 |
|---|---|---|
| 1回目 | 約2.3秒(Lambda初期化は約500ms) | さんま |
| 2回目 | 約1.4秒 | さんま |
| 3回目 | 約1.4秒 | さんま |
| 4回目 | 約1.8秒 | 補完計画 |
さいごに
LambdaからGCPのCloud Vision APIを使ってOCRを行ってみました。 なによりも、GCPのサービスがすごく手軽に使えた点に驚きました。ほかにもいろいろとできそうですね。
参考
- Vision AI | ML から画像情報を引き出す | Cloud Vision API | Google Cloud
- OCR 言語のサポート | Cloud Vision API | Google Cloud
- Vision クライアント ライブラリ | Cloud Vision API | Google Cloud
- 画像内の手書き入力を検出する | Cloud Vision API | Google Cloud
- Detect handwriting in images | Cloud Vision API | Google Cloud
- Import Error (Vision API) 'ImportError: cannot import name 'types' from 'google.cloud.vision' · Issue #57 · googleapis/python-vision
- android - Specify language for response in Google Cloud Vision API - Stack Overflow