グラフ型データベースAmazon Neptuneでレコメンデーション検索を試してみる(前編)
この記事は公開されてから1年以上経過しています。情報が古い可能性がありますので、ご注意ください。
はじめに
サーバーレス開発部@大阪の岩田です。
私が勤務している大阪オフィスでは「CM大阪盛り上げる会」と題し、所属部署関係無しにいくつかのチームを組んで、大阪オフィス独自の取り組みに挑戦しています。 私は取り組みの中の1つである「データ分析部」に所属しており、「グラフ型データベースについて調査して、ブログにアウトプットする」という課題に取組んでいます。 本エントリが記念すべき活動第一弾になります!!
今回から2回に分けて、先日GAされたばかりのAmazon Neptune(以後Neptuneと表記します)を使用した、レコメンデーション検索を試してみたいと思います。 第一回の今回は、Neptuneの環境を構築し、簡単なクエリを発行するところまで実施してみたいと思います。
※後編へのリンクを追加しました
グラフ型データベースとは?
まずグラフ型データベースとは何でしょうか? AWSのユーザーガイドから引用します。
Neptune などのグラフデータベースは、リレーションシップを保存し、ナビゲートするために構築された専用のデータベースです。データ間の関係を作成し、これらの関係を迅速にクエリする必要があるとき、ソーシャルネットワーキング、推奨エンジン、また不正検出を含む特定のユースケースで、グラフデータベースにはリレーショナルデータベースより利点があります。
ユーザーガイドに記載されている通り、ノード間の関係を表現することに特化したデータベースで、製品によって多少呼び方は違いますが、
- ノード
- プロパティ
- リレーション
- ラベル
という要素を用いて、データ間の関連性を表現するデータベースです。
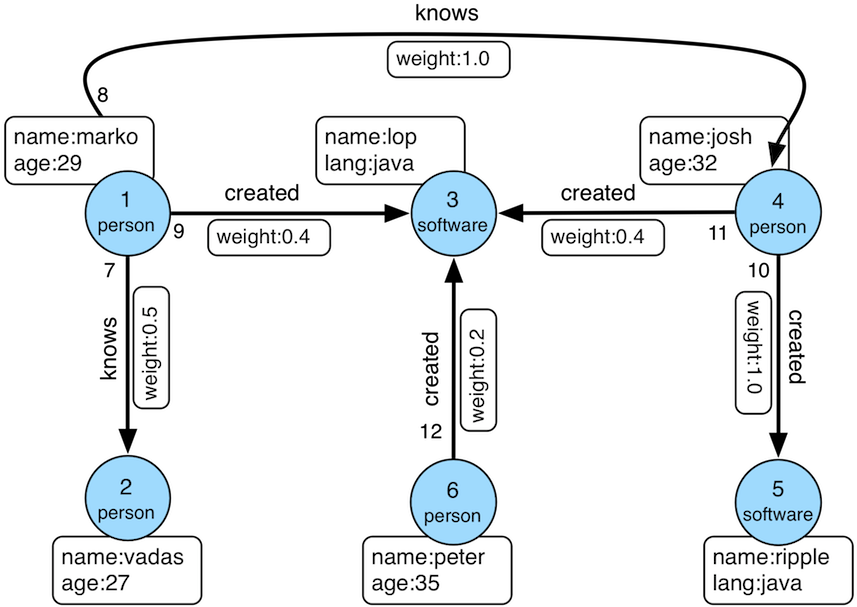
下記はApacheTinkerPOPのサイトから引用した画像です。
 ApacheTinkerPOPDocumentation
それぞれ
- ノード:青い丸
- プロパティ:ノードやリレーションの付近に置かれている四角(name,age等)
- リレーション:矢印
- ラベル:ノードに書かれている説明文(personとかsoftware)
となります。
グラフ型データベースを使用することで、RDBの苦手な
- ソーシャルグラフの検索
- 木構造データの検索
- 経路検索
- レコメンデーション検索
といった処理が簡単に行えるそうです。 私は元々前職で物流に関わるような仕事もしていたので、経路検索が得意なグラフ型データベースには以前から興味を持っていました。
Neptuneとは?
AWSが提供する、フルマネージドのグラフ型データベースサービスです。 AWS公式ドキュメントの「よくある質問」には下記のように記載されています。
Amazon Neptune は高速で信頼性が高いフルマネージドグラフデータベースサービスであり、これを使用することで高度に接続されたデータセットと連携するアプリケーションの構築と実行が簡単になります。高度に接続されたデータの SQL クエリは複雑で、パフォーマンスの調整は困難です。代わりに、Amazon Neptune では、公開されている一般的なグラフクエリ言語を使用して、書き込みが容易で、接続されたデータをうまく処理する強力なクエリを実行できます。Neptune の中核となるのは、数十億の関係を保存し、ミリ秒単位のレイテンシーでグラフをクエリするために最適化された、専用の高性能グラフデータベースエンジンです。Neptune は、推奨エンジン、不正検出、知識グラフ、創薬、ネットワークセキュリティなどのグラフのユースケースに使用できます。Amazon Neptune はフルマネージドで、プロビジョニング、パッチ適用、バックアップ、復旧、障害検出、修復などの時間がかかる作業を処理します。使用する各 Amazon Neptune データベースインスタンスに対して単純な月額方式の料金が発生します。前払い費用や長期契約は必要ありません。
Neptuneの環境構築
それでは、早速Neptuneの環境を構築してみます!! 諸々の作業を簡略化するため、CloudFormationテンプレートを使用して環境を構築します。 ※試しに触ってみることが目的なので、セキュリティグループやIAMロールの設定は適当です。本番環境では利用しないで下さい。
なお、2018年6月現在でNeptuneは東京リージョンに対応していないため、以後は全てバージニアリージョンを使用します。
AWSTemplateFormatVersion: 2010-09-09
Description: Neptune Handson
Parameters:
  KeyName:
    Description: Name of an existing EC2 KeyPair to enable SSH access to the instance
    Type: AWS::EC2::KeyPair::KeyName
    ConstraintDescription: must be the name of an existing EC2 KeyPair.
  SSHLocation:
    Description: The IP address range that can be used to SSH to the EC2 instances
    Type: String
    MinLength: 9
    MaxLength: 18
    Default: 0.0.0.0/0
    AllowedPattern: (\d{1,3})\.(\d{1,3})\.(\d{1,3})\.(\d{1,3})/(\d{1,2})
    ConstraintDescription: must be a valid IP CIDR range of the form x.x.x.x/x.
Resources:
  MyVPC:
    Type: AWS::EC2::VPC
    Properties:
      CidrBlock: 10.0.0.0/24
      EnableDnsSupport: 'true'
      EnableDnsHostnames: 'true'
      InstanceTenancy: default
  PublicRouteTable:
    Type: AWS::EC2::RouteTable
    Properties:
      VpcId: !Ref MyVPC
  PrivateRouteTable:
    Type: AWS::EC2::RouteTable
    Properties:
      VpcId: !Ref MyVPC
  PublicSubnet:
    Type: AWS::EC2::Subnet
    Properties:
      VpcId: !Ref MyVPC
      CidrBlock: 10.0.0.0/27
      AvailabilityZone: "us-east-1a"
      MapPublicIpOnLaunch: true
  PubSubnetARouteTableAssociation:
    Type: AWS::EC2::SubnetRouteTableAssociation
    Properties:
      SubnetId: !Ref PublicSubnet
      RouteTableId: !Ref PublicRouteTable
  PrivateSubnetA:
    Type: AWS::EC2::Subnet
    Properties:
      VpcId: !Ref MyVPC
      CidrBlock: 10.0.0.32/27
      AvailabilityZone: "us-east-1a"
  PrivateSubnetB:
    Type: AWS::EC2::Subnet
    Properties:
      VpcId: !Ref MyVPC
      CidrBlock: 10.0.0.64/27
      AvailabilityZone: "us-east-1b"
  SubnetARouteTableAssociation:
    Type: AWS::EC2::SubnetRouteTableAssociation
    Properties:
      SubnetId: !Ref PrivateSubnetA
      RouteTableId: !Ref PrivateRouteTable
  SubnetBRouteTableAssociation:
    Type: AWS::EC2::SubnetRouteTableAssociation
    Properties:
      SubnetId: !Ref PrivateSubnetB
      RouteTableId: !Ref PrivateRouteTable
  InternetGateway:
    Type: "AWS::EC2::InternetGateway"
  AttachGateway:
    Type: AWS::EC2::VPCGatewayAttachment
    Properties:
      VpcId: !Ref MyVPC
      InternetGatewayId: !Ref InternetGateway
  MyRoute:
    Type: AWS::EC2::Route
    DependsOn: InternetGateway
    Properties:
      RouteTableId: !Ref PublicRouteTable
      DestinationCidrBlock: 0.0.0.0/0
      GatewayId: !Ref InternetGateway
  DBCluster:
    Type: AWS::Neptune::DBCluster
    Properties:
      DBSubnetGroupName: !Ref DBSubnetGroup
      VpcSecurityGroupIds:
        - !GetAtt NeptuneSecurityGroup.GroupId
  DBInstance:
    Type: AWS::Neptune::DBInstance
    Properties:
      DBClusterIdentifier: !Ref DBCluster
      DBInstanceClass: db.r4.large
      DBSubnetGroupName: !Ref DBSubnetGroup
  DBSubnetGroup:
    Type: AWS::Neptune::DBSubnetGroup
    Properties:
      DBSubnetGroupDescription: Neptune DB Subnet Group
      SubnetIds:
        - !Ref PrivateSubnetA
        - !Ref PrivateSubnetB
  S3Bucket:
    Type: AWS::S3::Bucket
  S3Endpoint:
    Type: AWS::EC2::VPCEndpoint
    Properties:
      PolicyDocument:
        Version: 2012-10-17
        Statement:
          - Effect: Allow
            Principal: "*"
            Action:
              - s3:*
            Resource: "*"
      RouteTableIds:
        - !Ref PrivateRouteTable
      ServiceName: !Join
        - ''
        - - com.amazonaws.
          - !Ref AWS::Region
          - .s3
      VpcId: !Ref MyVPC
  EC2Instance:
    Type: AWS::EC2::Instance
    Properties:
      InstanceType: t2.micro
      SecurityGroupIds:
        - !Ref InstanceSecurityGroup
      KeyName: !Ref KeyName
      ImageId: ami-afd15ed0
      IamInstanceProfile: !Ref EC2InstanceProfile
      SubnetId: !Ref PublicSubnet
      UserData: !Base64
        Fn::Sub: |
          #!/bin/bash -xe
          yum install -y java-1.8.0-devel
          wget https://archive.apache.org/dist/tinkerpop/3.3.1/apache-tinkerpop-gremlin-console-3.3.1-bin.zip -P /home/ec2-user
          unzip /home/ec2-user/apache-tinkerpop-gremlin-console-3.3.1-bin.zip -d /home/ec2-user/
          chown ec2-user:ec2-user -R  /home/ec2-user/apache-tinkerpop-gremlin-console-3.3.1
  EC2InstanceProfile:
    Type: AWS::IAM::InstanceProfile
    Properties:
      Path: /
      Roles:
        - !Ref EC2InstanceRole
  EC2InstanceRole:
    Type: AWS::IAM::Role
    Properties:
      AssumeRolePolicyDocument:
        Version: 2012-10-17
        Statement:
          -
            Effect: Allow
            Principal:
              Service:
                - ec2.amazonaws.com
            Action:
              - sts:AssumeRole
      Path: /
  EC2InstanceAllowS3:
    Type: AWS::IAM::Policy
    Properties:
      PolicyName: AllowS3
      PolicyDocument:
        Version: 2012-10-17
        Statement:
          -
            Effect: Allow
            Action: s3:*
            Resource: "*"
      Roles:
        - !Ref EC2InstanceRole
  NeptuneRole:
    Type: AWS::IAM::Role
    Properties:
      AssumeRolePolicyDocument:
        Version: 2012-10-17
        Statement:
          -
            Effect: Allow
            Principal:
              Service:
                - rds.amazonaws.com
            Action:
              - sts:AssumeRole
      Path: /
  NeptuneAllowS3:
    Type: AWS::IAM::Policy
    Properties:
      PolicyName: AllowS3
      PolicyDocument:
        Version: 2012-10-17
        Statement:
          -
            Effect: Allow
            Action: s3:*
            Resource: "*"
      Roles:
        - !Ref NeptuneRole
  NeptuneSecurityGroup:
    Type: AWS::EC2::SecurityGroup
    Properties:
      GroupDescription: Allow Neptune Access From Private Subnet
      VpcId: !Ref MyVPC
      SecurityGroupIngress:
      - IpProtocol: tcp
        FromPort: 8182
        ToPort: 8182
        CidrIp: 0.0.0.0/0
  InstanceSecurityGroup:
    Type: AWS::EC2::SecurityGroup
    Properties:
      GroupDescription: Enable SSH access via port 22
      VpcId: !Ref MyVPC
      SecurityGroupIngress:
      - IpProtocol: tcp
        FromPort: 22
        ToPort: 22
        CidrIp: !Ref 'SSHLocation'
Outputs:
  EC2PublicDNS:
    Description: Public DNSName of the newly created EC2 instance
    Value: !GetAtt EC2Instance.PublicDnsName
  S3BucketName:
    Description: S3Bucket
    Value: !Ref S3Bucket
  NeptuneEndPoint:
    Description: Neptune EndPoint URL
    Value: !GetAtt DBCluster.Endpoint
  NeptuneRoleArn:
    Description: Neptune Role Arn
    Value: !GetAtt  NeptuneRole.Arn
要点をいくつか説明します。
VPCの作成
NeptuneはVPC内に作成する必要があるため、Neptune用のVPCを作成しています。
Neptuneと同一VPC内にEC2を作成
2018年6月現在では、マネジメントコンソールからNeptuneへのクエリを発行するといったことはできません。 そのため、Neptuneの同一VPC内にEC2の環境を構築して、EC2からNeptuneに対してクエリを発行します。
Amazon Neptuneは
- Gremlin
- SPARQL
という2つのクエリエンジンを使用することができるのですが、今回はGremlinを使用して試してみます。 ユーザーデータの中でGremlin ConsoleというツールのDLを行なっています。
S3バケットとVPCエンドポイント作成
Neptuneへのデータロードには、VPCエンドポイント経由でアクセス可能なS3バケットが必要になります。 テンプレートの中でS3バケットの作成と、VPCエンドポイントの作成まで行います。
Neptuneに関連付けるIAMロールの作成
上記同様ですが、NeptuneからS3バケットにアクセスするためのIAMロールを作成し、NeptuneのDBクラスターにアタッチしておく必要があります。 現状IAMロールのアタッチがCloudFormationのテンプレートで対応できないようなので、IAMロールの作成までを行い、IAMロールのアタッチは後ほどAWS CLIから実施します。
Gremlin コンソールを使用して Neptune DB インスタンスに接続する
CloudFormationの実行が完了したら、実際にNeptune DBインスタンスに接続してクエリを発行してみます。
まずはCloudFormationで作成したEC2インスタンスにSSH接続します。
EC2のユーザーデータでインストールしたGremlin Consoleのディレクトリ(/home/ec2-user/apache-tinkerpop-gremlin-console-3.3.1/)まで移動し、conf/remote.yamlというファイルを編集、接続先を構築したNeptuneのエンドポイントに書き換えます。
※NeptuneのエンドポイントはCloudFormationのOutputを参照して下さい。
#...略
##############################################################
# This configuration is meant to have Gremlin Server return
# text serialized objects. The server will toString()
# results giving a view into how scripts are executing.
#
# This file will work with:
# - gremlin-server.yaml
# - gremlin-server-classic.yaml
# - gremlin-server-modern.yaml
# - gremlin-server-modern-readonly.yaml
##############################################################

hosts: [dbcluster-xxxxxxx.cluster-xxxxxx.us-east-1.neptune.amazonaws.com]
port: 8182
serializer: { className: org.apache.tinkerpop.gremlin.driver.ser.GryoMessageSerializerV3d0, config: { serializeResultToString: true }}
次にbin/gremlin.shを実行し、Gremlin Consoleを起動します。
[ec2-user@ip-10-0-0-8 apache-tinkerpop-gremlin-console-3.3.1]$ bin/gremlin.sh


         \,,,/
         (o o)
-----oOOo-(3)-oOOo-----
plugin activated: tinkerpop.server
plugin activated: tinkerpop.utilities
plugin activated: tinkerpop.tinkergraph
gremlin>
Gremlin Consoleを起動したら
:remote connect tinkerpop.server conf/remote.yaml、
:remote console
と入力し、接続先をNeptuneに向けます。
gremlin> :remote connect tinkerpop.server conf/remote.yaml
==>Configured dbcluster-xxxxxx.cluster-xxxxxx.us-east-1.neptune.amazonaws.com/10.0.0.89:8182
gremlin> :remote console
==>All scripts will now be sent to Gremlin Server - [dbcluster-xxxxxx.cluster-xxxxxx.us-east-1.neptune.amazonaws.com/10.0.0.89:8182] - type ':remote console' to return to local mode
gremlin>
これで準備OKです! 実際にNeptuneにデータを登録し、クエリを発行してみます。
gremlin> g.addV('person').property('name', 'justin')
==>v[28b1f637-2d2d-10a6-9122-67807e7c2737]
gremlin> g.V().hasLabel('person')
==>v[28b1f637-2d2d-10a6-9122-67807e7c2737]
簡単な内容ですが、 nameというプロパティがjustinのノードを追加した後、personというラベルを持つノードを検索しています。 無事にクエリが実行できました!!
まとめ
いかがだったでしょうか? まだGAされたばかりで情報が少ないですが、非常に面白いサービスだと感じました。 今のうちにたくさん触り倒して、グラフ型データベースやNeptuneに関する知識をしっかり身につけておきたいと思います。 次回はNeptuneにデータをロードし、レコメンデーション検索を実行してみたいと思います。


