Amazon Q Developer CLIで日本語による対話コーディングを試してみた
こんにちは、クラウド事業本部 コンサルティング部の荒平(@eiraces)です。
2025年4月にAmazon Q Developerが正式に日本語サポートしました。DevelopersIOでも紹介記事が出ておりますので、是非参照ください。
この中でも、 Amazon Q Developer CLIについての日本語サポートがなかなか熱かった ので、これを活用してWEBアプリケーションを作成するまでをやってみたいと思います。
インストールと初期設定に関しては、上記記事を参照して進めてください。執筆時点ではmacOS対応、Windowsの場合はWSLにインストールできます。
インストール後にはAWS Builder IDでのログインが求められます。
brew install amazon-q
Amazon Qによる対話コーディングを試してみる
まずは q コマンドにて、Amazon Qを立ち上げます。

続いて、何でも良いのですが、アプリケーションを出力してもらいます。
今回は電卓Webページを作ってもらうことにしました。
> 電卓をWebページとして公開したいです。コードをファイルとして出力し、ローカルに保存してください。

電卓をWebページとして公開するためのHTMLとJavaScriptコードを作成します。シンプルで使いやすい電卓を作りましょう。

まず、必要なファイルを作成します:

1. HTML ファイル (calculator.html)
2. CSS ファイル (calculator.css)
3. JavaScript ファイル (calculator.js)

これらのファイルをデスクトップに保存します。

[Tool Request] Write to filesystem
▔▔▔▔▔▔▔▔▔▔▔▔▔▔▔▔▔▔▔▔▔▔▔▔▔▔▔▔▔▔▔▔▔▔▔▔▔▔▔▔▔▔▔▔▔▔▔▔▔▔▔▔▔▔▔▔▔▔▔▔▔▔▔▔▔▔▔▔▔▔▔▔▔▔▔▔▔▔▔▔▔▔▔▔▔▔▔▔▔▔▔▔▔▔▔▔▔▔▔▔▔▔▔▔▔▔▔▔▔▔▔▔
Path: /Users/arahira.yuji/Desktop/calculator.html

+     1: <!DOCTYPE html>
+     2: <html lang="ja">
+     3: <head>
+     4:     <meta charset="UTF-8">
+     5:     <meta name="viewport" content="width=device-width, initial-scale=1.0">
+     6:     <title>シンプル電卓</title>
+     7:     <link rel="stylesheet" href="calculator.css">
+     8: </head>
+     9: <body>
+    10:     <div class="calculator">
+    11:         <h1>シンプル電卓</h1>
+    12:         <div class="calculator-display">
+    13:             <input type="text" id="display" readonly>
+    14:         </div>
+    15:         <div class="calculator-keys">
+    16:             <button class="key-clear" id="clear">C</button>
+    17:             <button class="key-operator" id="backspace">←</button>
+    18:             <button class="key-operator" id="divide">÷</button>
+    19:             <button class="key-operator" id="multiply">×</button>
+    20:
+    21:             <button class="key-number" id="seven">7</button>
+    22:             <button class="key-number" id="eight">8</button>
+    23:             <button class="key-number" id="nine">9</button>
+    24:             <button class="key-operator" id="subtract">-</button>
+    25:
+    26:             <button class="key-number" id="four">4</button>
+    27:             <button class="key-number" id="five">5</button>
+    28:             <button class="key-number" id="six">6</button>
+    29:             <button class="key-operator" id="add">+</button>
+    30:
+    31:             <button class="key-number" id="one">1</button>
+    32:             <button class="key-number" id="two">2</button>
+    33:             <button class="key-number" id="three">3</button>
+    34:             <button class="key-equals" id="equals">=</button>
+    35:
+    36:             <button class="key-number key-zero" id="zero">0</button>
+    37:             <button class="key-decimal" id="decimal">.</button>
+    38:         </div>
+    39:     </div>
+    40:     <script src="calculator.js"></script>
+    41: </body>
+    42: </html>

Allow this action? Use 't' to trust (always allow) this tool for the session. [y/n/t]:

>
最後に、このアクションを承認するか聞かれるので、y/n/tで回答します。yは一度きりのyes、tはこのセッション中は全て承認します。
ファイルごとに保存→思考の処理が行われます。
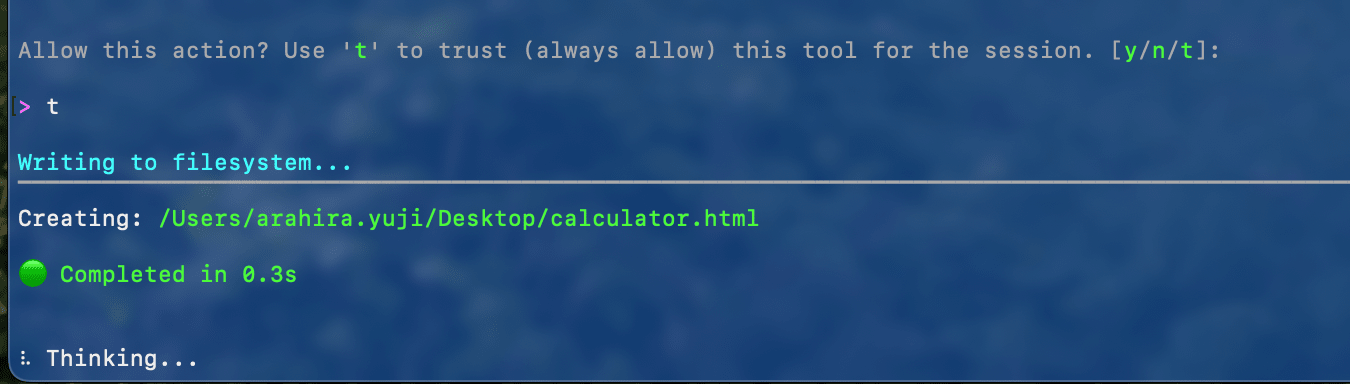
完了すると、Amazon Qが作成したスクリプトの使い方を教えてくれます。
(例外エラーにより1度やり直したので、1ファイルになりました)
電卓のWebページを作成しました!デスクトップに calculator.html というファイルを保存しました。

このファイルには以下の機能を持つ電卓が含まれています:

• 基本的な四則演算(足し算、引き算、掛け算、割り算)
• 小数点の入力
• クリア機能
• バックスペース機能
• キーボード入力のサポート

使い方:
1. デスクトップにある calculator.html ファイルをダブルクリックしてブラウザで開きます
2. 画面上のボタンをクリックするか、キーボードで数字や演算子を入力して計算できます

キーボードショートカット:
• 数字キー (0-9): 数字入力
• +, -, , /: 演算子
• Enter または =: 計算実行
• . (ピリオド): 小数点
• Backspace: 一文字削除
• Escape: すべてクリア

このファイルはHTMLとCSSとJavaScriptを1つのファイルにまとめているので、追加のファイルは必要ありません。ブラウザで
開くだけで使用できます。
ブラウザで開いてーと言ったら、SafariでそのままWebページも開いて見せてくれます。全部Amazon Qに任せられますね。

対話型の強みを確認するため、追加機能を開発することにして続けてみます。
以下のプロンプトを投げてみました。
 電卓として機能を増やしたくなりました。
 Amazon EC2の月間料金を計算しやすいような形に変更してください。
 サンプルとしてリストするのは、東京リージョン, Linux, オンデマンドの料金で代表的なインスタンスのみで問題ありません
完成したのが以下の画面です。590行くらいに変更が入っており、明らかに人間がコーディングするより早いです。
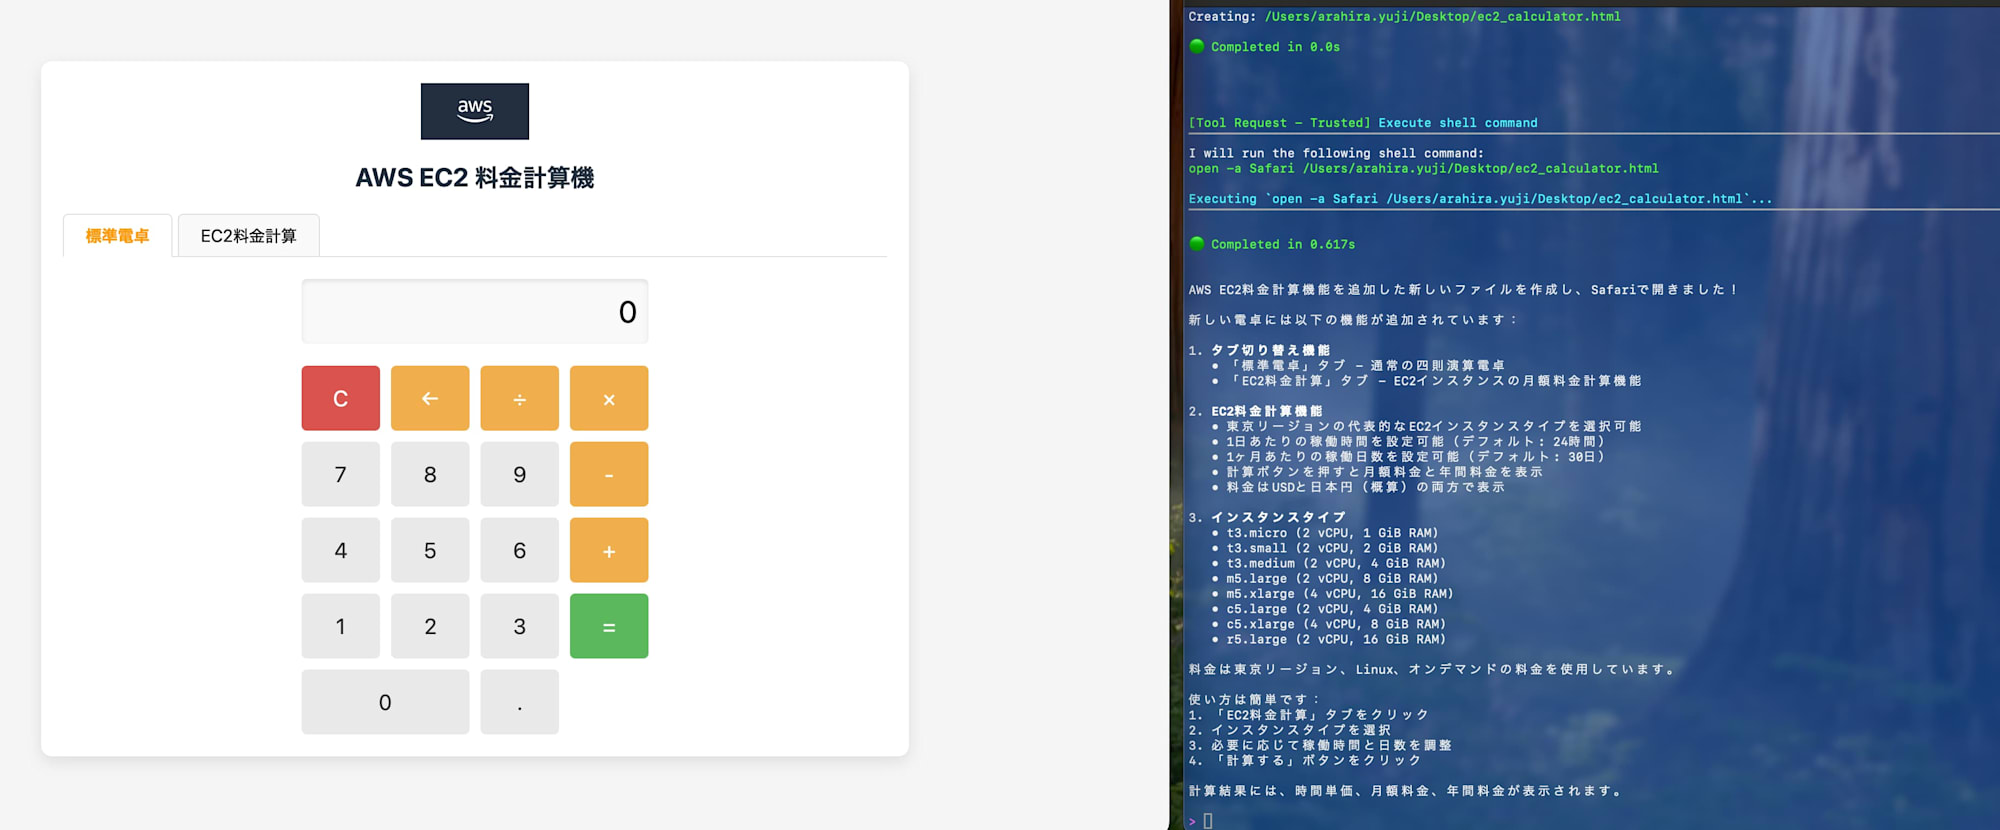
欲しかった料金計算機能も付いています。t3, m5, c5, r5ファミリーのよく使われそうなインスタンス情報を付けてくれました。
軽く確認した感じだと、単価などの数値間違いは起こっていませんでした。
個人的に驚いたのは、1ドル=150円で自動計算されているところです。執筆時点の為替は1ドル=140円前後ですが、プロンプトを与えずともAmazon Qが150円を指標としてどこからか持ってきています。

対話しながらAmplify+S3で公開してみる
同じセッションのまま、以下のプロンプトを投げてみます。
いいですね!ではこのアプリをWEBに公開したくなりました。適当なS3に格納し、Amplifyで公開してください。
Amazon Qからツールのリクエストが随時来るので、承認していきます。
tで承認スキップは可能なのですが、CLIに持たせている権限が大きいので今回は全部確認しました。
[Tool Request] Use AWS CLI
▔▔▔▔▔▔▔▔▔▔▔▔▔▔▔▔▔▔▔▔▔▔▔▔▔▔▔▔▔▔▔▔▔▔▔▔▔▔▔▔▔▔▔▔▔▔▔▔▔▔▔▔▔▔▔▔▔▔▔▔▔▔▔▔▔▔▔▔▔▔▔▔▔▔▔▔▔▔▔▔▔▔▔▔▔▔▔▔▔▔▔▔▔▔▔▔▔▔▔▔▔▔▔▔▔▔▔▔▔▔▔▔
Running aws cli command:
Service name: s3api
Operation name: create-bucket
Parameters:
- Bucket: "ec2-calculator-app-arap"
- CreateBucketConfiguration: {"LocationConstraint":"ap-northeast-1"}
Profile name: default
Region: ap-northeast-1
Label: EC2計算機用のS3バケットを作成

Allow this action? Use 't' to trust (always allow) this tool for the session. [y/n/t]:

> y

Using AWS CLI...
▔▔▔▔▔▔▔▔▔▔▔▔▔▔▔▔▔▔▔▔▔▔▔▔▔▔▔▔▔▔▔▔▔▔▔▔▔▔▔▔▔▔▔▔▔▔▔▔▔▔▔▔▔▔▔▔▔▔▔▔▔▔▔▔▔▔▔▔▔▔▔▔▔▔▔▔▔▔▔▔▔▔▔▔▔▔▔▔▔▔▔▔▔▔▔▔▔▔▔▔▔▔▔▔▔▔▔▔▔▔▔▔

🟢 Completed in 1.994s

[Tool Request] Use AWS CLI
▔▔▔▔▔▔▔▔▔▔▔▔▔▔▔▔▔▔▔▔▔▔▔▔▔▔▔▔▔▔▔▔▔▔▔▔▔▔▔▔▔▔▔▔▔▔▔▔▔▔▔▔▔▔▔▔▔▔▔▔▔▔▔▔▔▔▔▔▔▔▔▔▔▔▔▔▔▔▔▔▔▔▔▔▔▔▔▔▔▔▔▔▔▔▔▔▔▔▔▔▔▔▔▔▔▔▔▔▔▔▔▔
Running aws cli command:
Service name: s3api
Operation name: put-object
Parameters:
- Bucket: "ec2-calculator-app-arap"
- Body: "/Users/arahira.yuji/Desktop/ec2_calculator.html"
- ContentType: "text/html"
- Key: "index.html"
Profile name: default
Region: ap-northeast-1
Label: HTMLファイルをS3バケットにアップロード

Allow this action? Use 't' to trust (always allow) this tool for the session. [y/n/t]:

> y

Using AWS CLI...
▔▔▔▔▔▔▔▔▔▔▔▔▔▔▔▔▔▔▔▔▔▔▔▔▔▔▔▔▔▔▔▔▔▔▔▔▔▔▔▔▔▔▔▔▔▔▔▔▔▔▔▔▔▔▔▔▔▔▔▔▔▔▔▔▔▔▔▔▔▔▔▔▔▔▔▔▔▔▔▔▔▔▔▔▔▔▔▔▔▔▔▔▔▔▔▔▔▔▔▔▔▔▔▔▔▔▔▔▔▔▔▔

🟢 Completed in 1.113s

[Tool Request] Use AWS CLI
▔▔▔▔▔▔▔▔▔▔▔▔▔▔▔▔▔▔▔▔▔▔▔▔▔▔▔▔▔▔▔▔▔▔▔▔▔▔▔▔▔▔▔▔▔▔▔▔▔▔▔▔▔▔▔▔▔▔▔▔▔▔▔▔▔▔▔▔▔▔▔▔▔▔▔▔▔▔▔▔▔▔▔▔▔▔▔▔▔▔▔▔▔▔▔▔▔▔▔▔▔▔▔▔▔▔▔▔▔▔▔▔
Running aws cli command:
Service name: s3api
Operation name: put-bucket-website
Parameters:
- WebsiteConfiguration: {"IndexDocument":{"Suffix":"index.html"}}
- Bucket: "ec2-calculator-app-arap"
Profile name: default
Region: ap-northeast-1
Label: S3バケットをウェブサイトとして設定

Allow this action? Use 't' to trust (always allow) this tool for the session. [y/n/t]:

> y

Using AWS CLI...
▔▔▔▔▔▔▔▔▔▔▔▔▔▔▔▔▔▔▔▔▔▔▔▔▔▔▔▔▔▔▔▔▔▔▔▔▔▔▔▔▔▔▔▔▔▔▔▔▔▔▔▔▔▔▔▔▔▔▔▔▔▔▔▔▔▔▔▔▔▔▔▔▔▔▔▔▔▔▔▔▔▔▔▔▔▔▔▔▔▔▔▔▔▔▔▔▔▔▔▔▔▔▔▔▔▔▔▔▔▔▔▔

🟢 Completed in 1.104s

[Tool Request] Use AWS CLI
▔▔▔▔▔▔▔▔▔▔▔▔▔▔▔▔▔▔▔▔▔▔▔▔▔▔▔▔▔▔▔▔▔▔▔▔▔▔▔▔▔▔▔▔▔▔▔▔▔▔▔▔▔▔▔▔▔▔▔▔▔▔▔▔▔▔▔▔▔▔▔▔▔▔▔▔▔▔▔▔▔▔▔▔▔▔▔▔▔▔▔▔▔▔▔▔▔▔▔▔▔▔▔▔▔▔▔▔▔▔▔▔
Running aws cli command:
Service name: s3api
Operation name: put-bucket-policy
Parameters:
- Policy: "{\"Version\":\"2012-10-17\",\"Statement\":[{\"Sid\":\"PublicReadGetObject\",\"Effect\":\"Allow\",\"Principal\":\"*\",\"Action\":\"s3:GetObject\",\"Resource\":\"arn:aws:s3:::ec2-calculator-app-arap/*\"}]}"
- Bucket: "ec2-calculator-app-arap"
Profile name: default
Region: ap-northeast-1
Label: S3バケットに公開アクセスポリシーを設定

Allow this action? Use 't' to trust (always allow) this tool for the session. [y/n/t]:

> y

Using AWS CLI...
▔▔▔▔▔▔▔▔▔▔▔▔▔▔▔▔▔▔▔▔▔▔▔▔▔▔▔▔▔▔▔▔▔▔▔▔▔▔▔▔▔▔▔▔▔▔▔▔▔▔▔▔▔▔▔▔▔▔▔▔▔▔▔▔▔▔▔▔▔▔▔▔▔▔▔▔▔▔▔▔▔▔▔▔▔▔▔▔▔▔▔▔▔▔▔▔▔▔▔▔▔▔▔▔▔▔▔▔▔▔▔▔

🔴 Execution failed after 1.79s:

An error occurred (AccessDenied) when calling the PutBucketPolicy operation: User: arn:aws:iam::489200000000:user/CLIUser is not authorized to perform: s3:PutBucketPolicy on resource: "arn:aws:s3:::ec2-calculator-app-arap" because public policies are blocked by the BlockPublicPolicy block public access setting.
おっと、S3のBlock Public Access設定により一部設定がエラーになってしまったようです。
そんな場合でも、自動で対処法を考え、エラーを回避してくれます。
[Tool Request - Trusted] Use AWS CLI
▔▔▔▔▔▔▔▔▔▔▔▔▔▔▔▔▔▔▔▔▔▔▔▔▔▔▔▔▔▔▔▔▔▔▔▔▔▔▔▔▔▔▔▔▔▔▔▔▔▔▔▔▔▔▔▔▔▔▔▔▔▔▔▔▔▔▔▔▔▔▔▔▔▔▔▔▔▔▔▔▔▔▔▔▔▔▔▔▔▔▔▔▔▔▔▔▔▔▔▔▔▔▔▔▔▔▔▔▔▔▔▔
Running aws cli command:
Service name: s3api
Operation name: get-public-access-block
Parameters:
- Bucket: "ec2-calculator-app-arap"
Profile name: default
Region: ap-northeast-1
Label: S3バケットのパブリックアクセス設定を確認

Using AWS CLI...
▔▔▔▔▔▔▔▔▔▔▔▔▔▔▔▔▔▔▔▔▔▔▔▔▔▔▔▔▔▔▔▔▔▔▔▔▔▔▔▔▔▔▔▔▔▔▔▔▔▔▔▔▔▔▔▔▔▔▔▔▔▔▔▔▔▔▔▔▔▔▔▔▔▔▔▔▔▔▔▔▔▔▔▔▔▔▔▔▔▔▔▔▔▔▔▔▔▔▔▔▔▔▔▔▔▔▔▔▔▔▔▔

🟢 Completed in 0.943s
デプロイ中に4-5個エラーが出てしまいましたが、これらも自動で対応してくれました。ほとんど人間が介するところはありません。
一番最初のコーディング開始からおよそ20分、公開サイトのWEBアプリケーションが1つ完成しました。
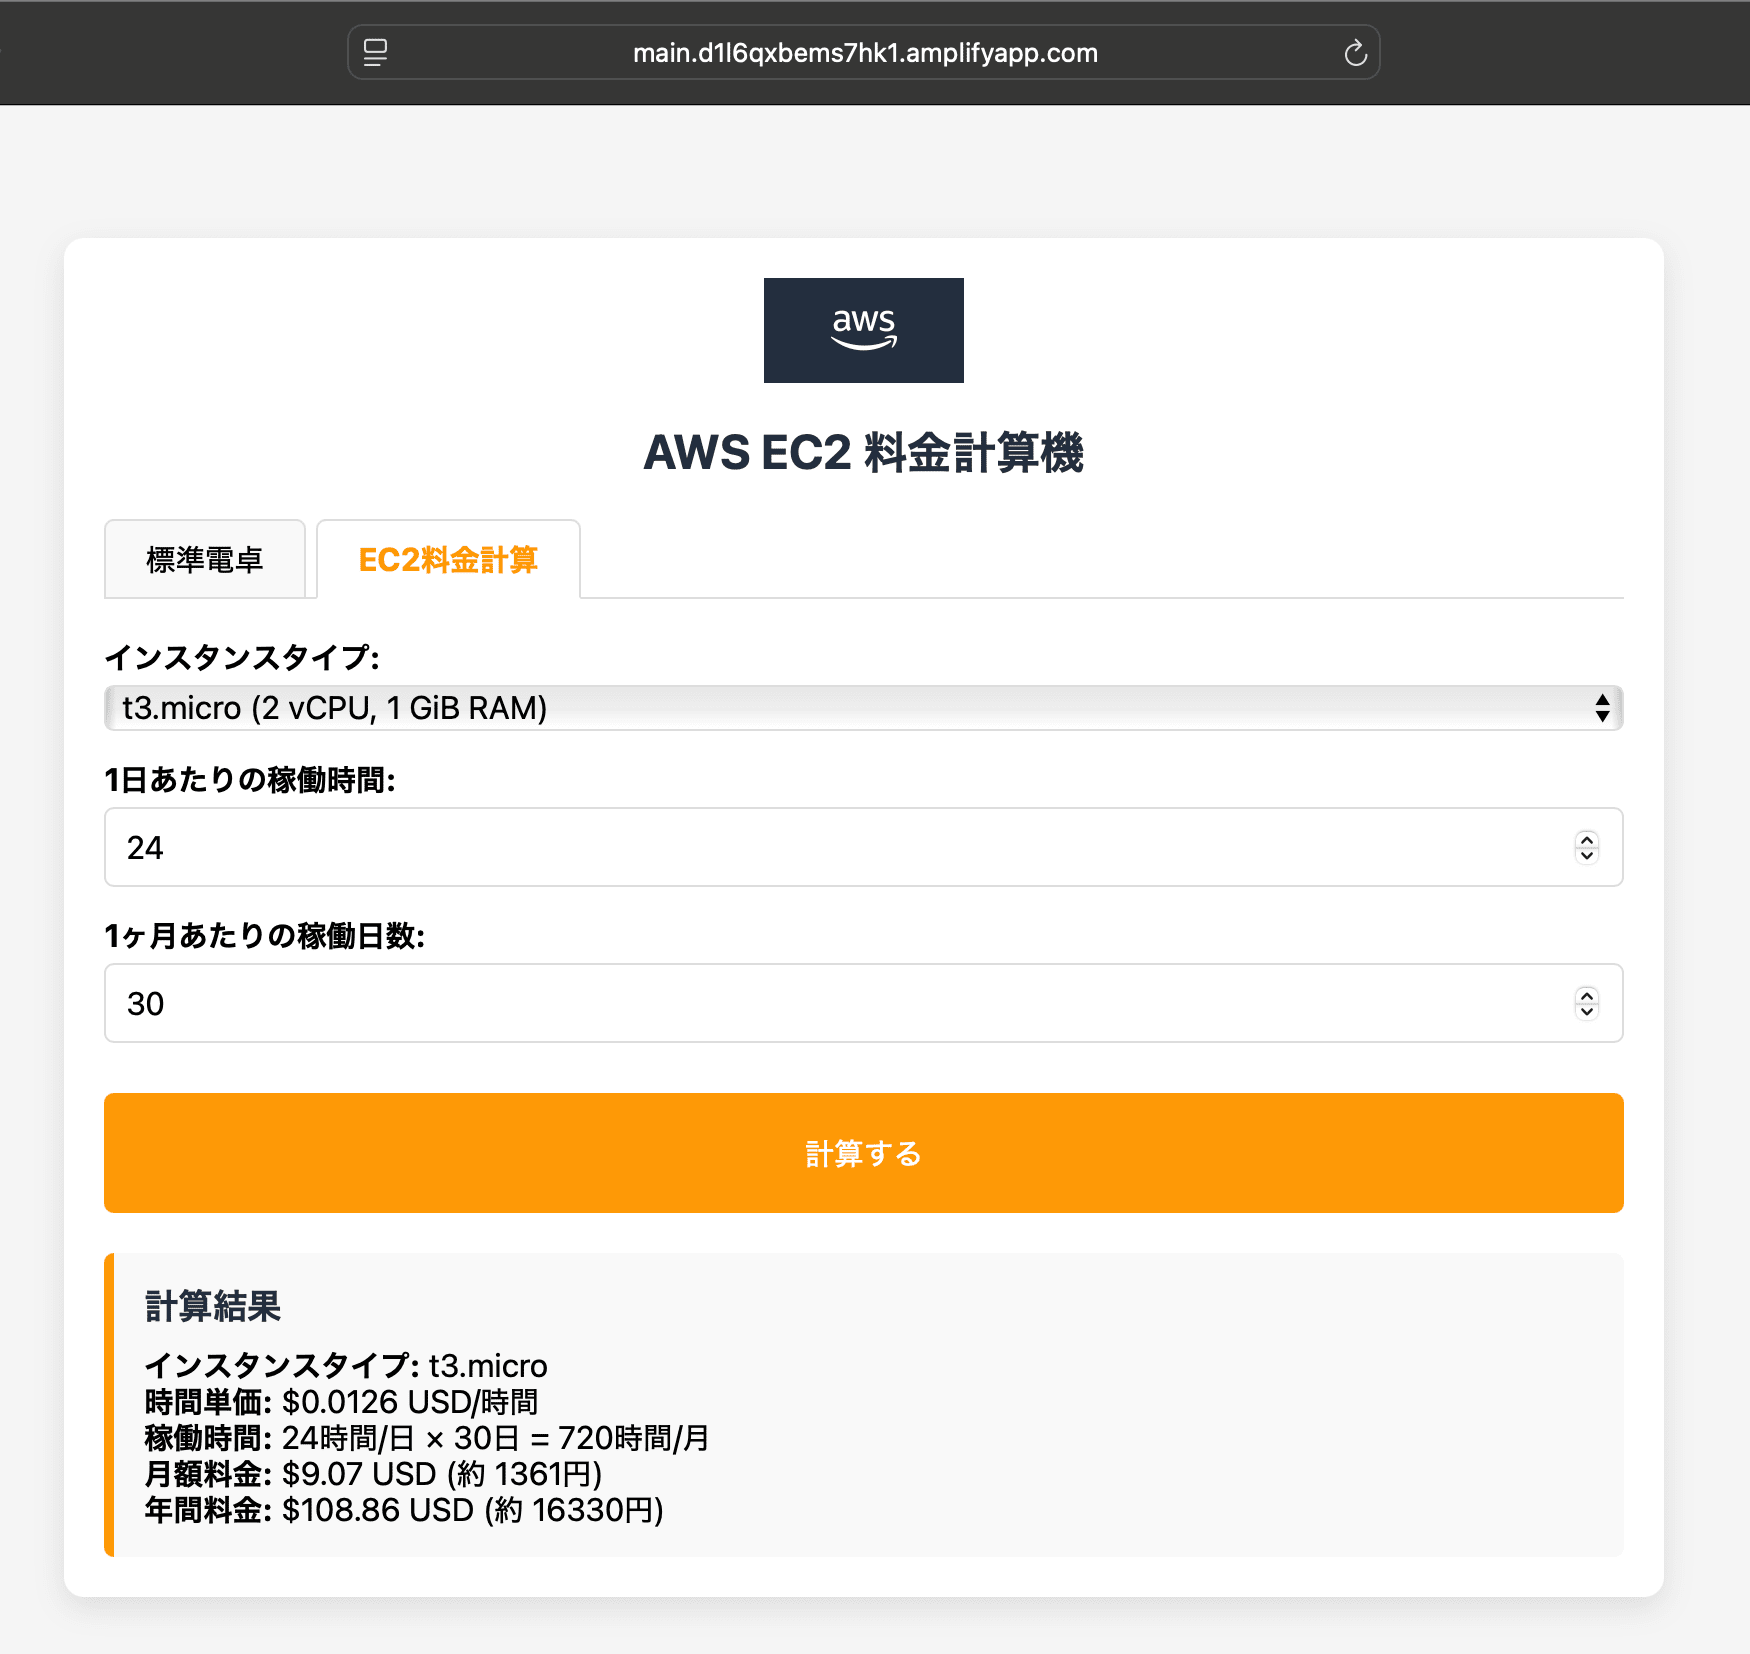
成功しました!Amplifyのデプロイが完了し、EC2料金計算機アプリケーションが正常に公開されました。以下に詳細をまとめます。

## Amplifyデプロイの成功

Amplifyのデプロイが成功し、アプリケーションが公開されました。デプロイの問題を解決するために以下の手順を実行しま
した:

1. 新しいAmplifyアプリを作成
   • 以前のアプリに問題があったため、新しいアプリ「EC2CalculatorApp」を作成
   • カスタムルールを設定して、すべてのパスをindex.htmlにリダイレクト

2. 適切なビルド設定
   • シンプルなビルド仕様を設定し、ビルドプロセスを簡素化
   • HTMLフレームワークとして設定し、静的ウェブサイトとして扱うよう指定

3. デプロイプロセスの最適化
   • ZIPファイルを直接S3にアップロード
   • 明示的にデプロイを開始するコマンドを実行

4. デプロイの成功確認
   • ジョブステータスが「SUCCEED」に変更されたことを確認
   • スクリーンショットが生成され、アプリが正常に表示されていることを確認

## Amplifyアプリケーションの公開URL

https://main.d1l6qxbems7hk1.amplifyapp.com

このURLでEC2料金計算機にアクセスできます。Amplifyのデプロイが成功したため、今後はAmplify WAFなどの追加機能も利用
できるようになりました。

## Amplifyのメリット(S3静的ウェブサイトホスティングと比較して)

1. WAF統合: Amplify WAFを使用してセキュリティを強化できる
2. プレビュー環境: 複数のブランチを同時にデプロイして比較できる
3. CI/CD統合: GitHubなどのリポジトリと連携して自動デプロイが可能
4. パフォーマンス最適化: CDNによる高速配信とキャッシュ管理
5. レスポンシブプレビュー: 様々なデバイスでの表示を確認可能(スクリーンショットが自動生成される)

## 今後の更新方法

1. コンソールからの更新:
   • AWS Amplifyコンソールから直接ファイルをアップロード

2. APIを使用した更新:

bash
   # 新しいデプロイを作成
   aws amplify create-deployment --app-id d1l6qxbems7hk1 --branch-name main --region ap-northeast-1

   # ZIPファイルをアップロード
   curl -X PUT -H "Content-Type: application/zip" --data-binary @/path/to/app.zip "アップロードURL"

   # デプロイを開始
   aws amplify start-deployment --app-id d1l6qxbems7hk1 --branch-name main --job-id JOB_ID --region ap-northeast-1

これでAmplifyを使ったデプロイが完了し、将来的にAmplify WAFなどの機能も利用できる状態になりました。ブラウザで上記のURLにアクセスして、EC2料金計算機をご確認ください!
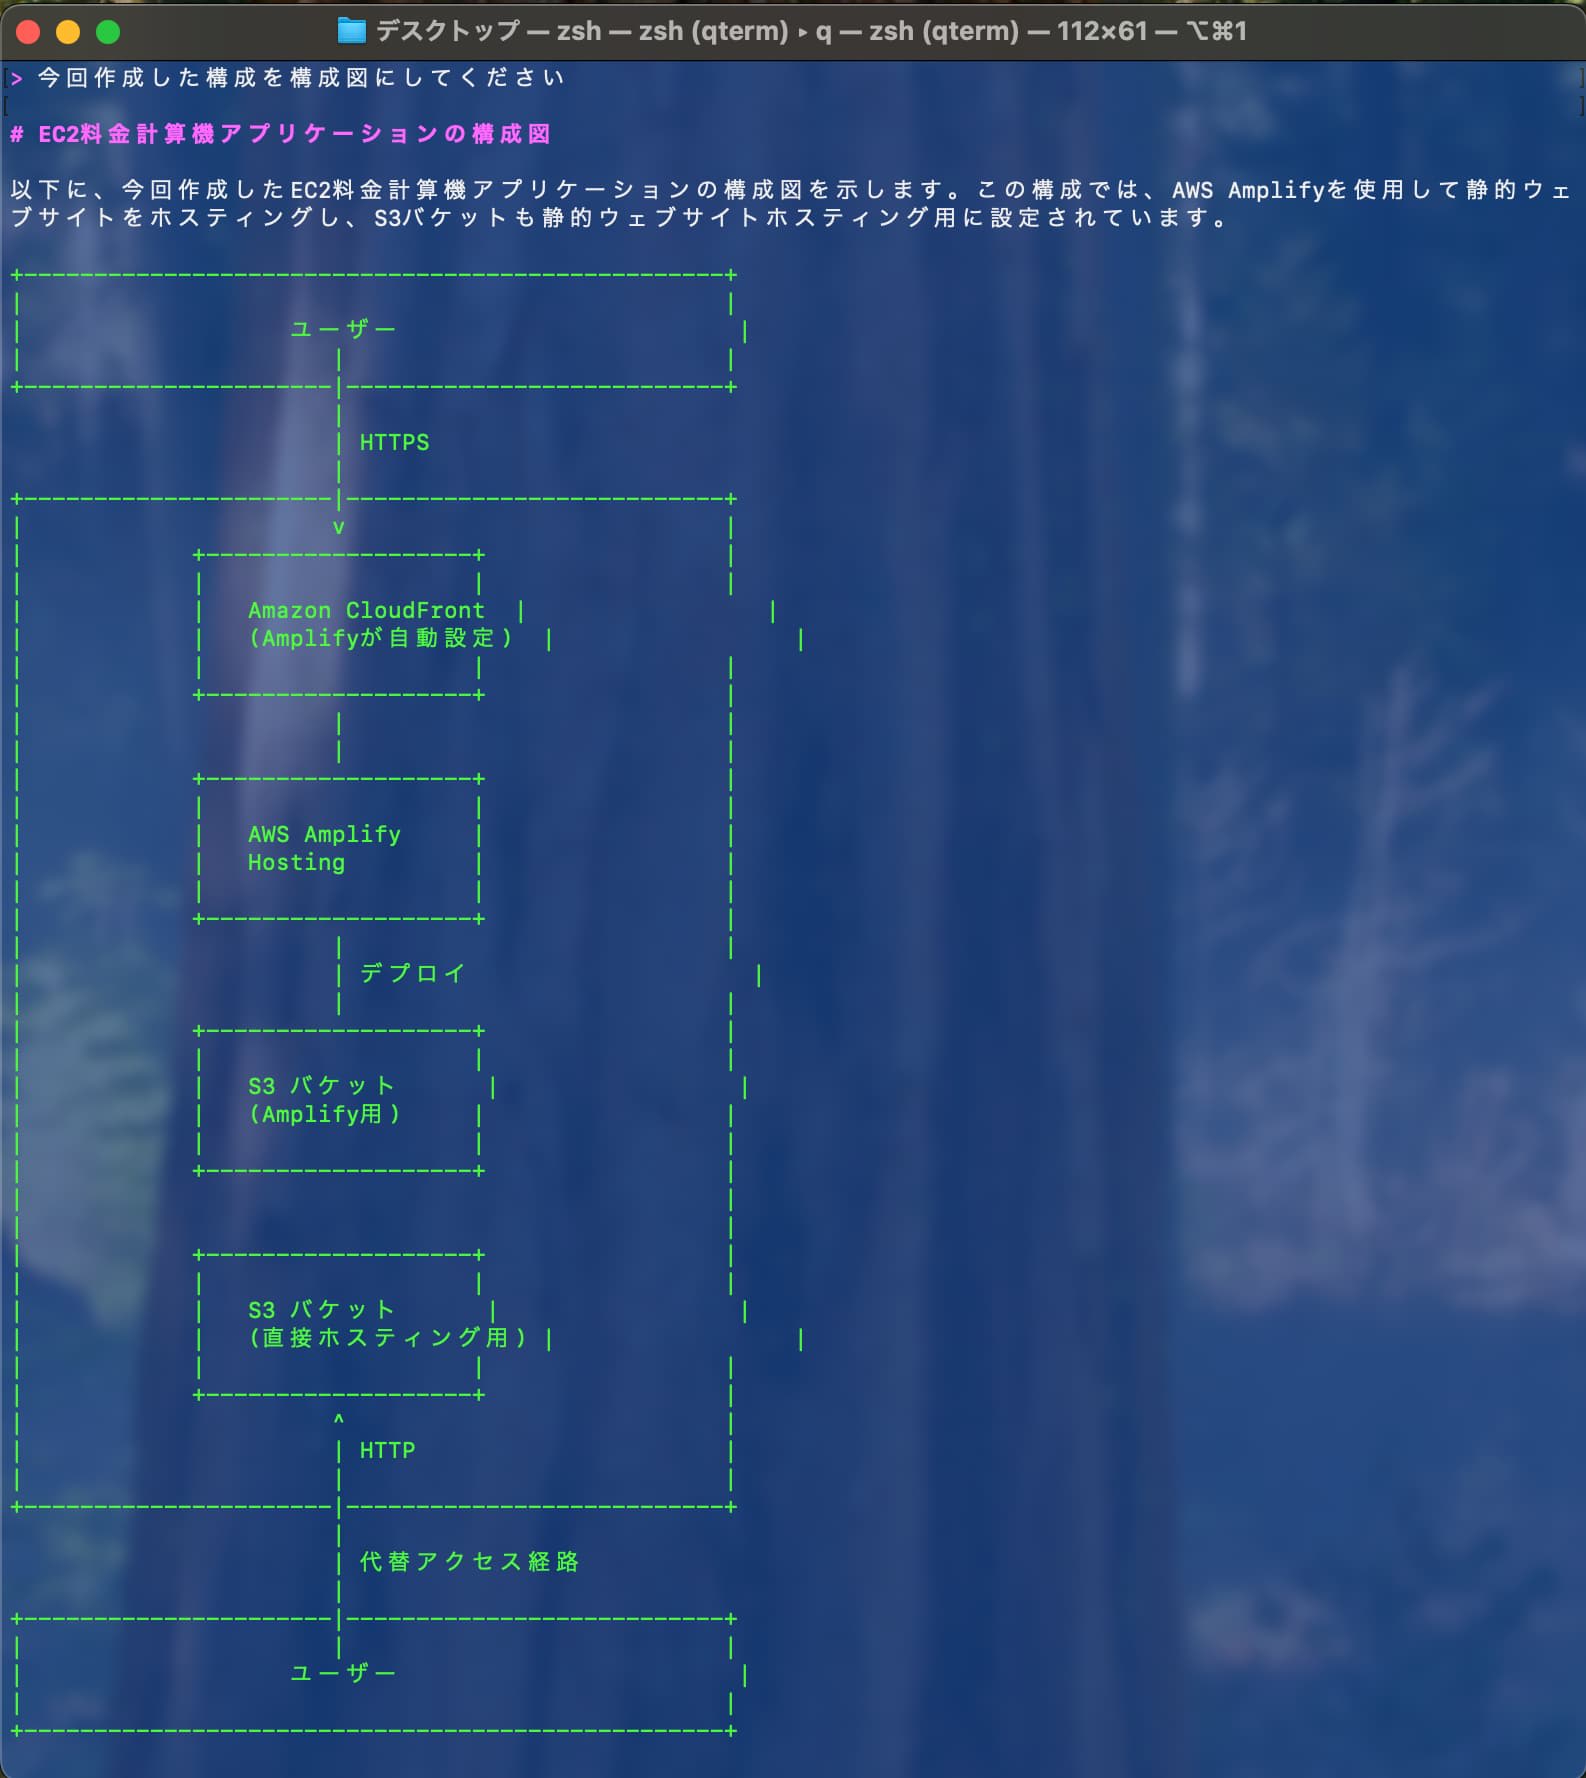
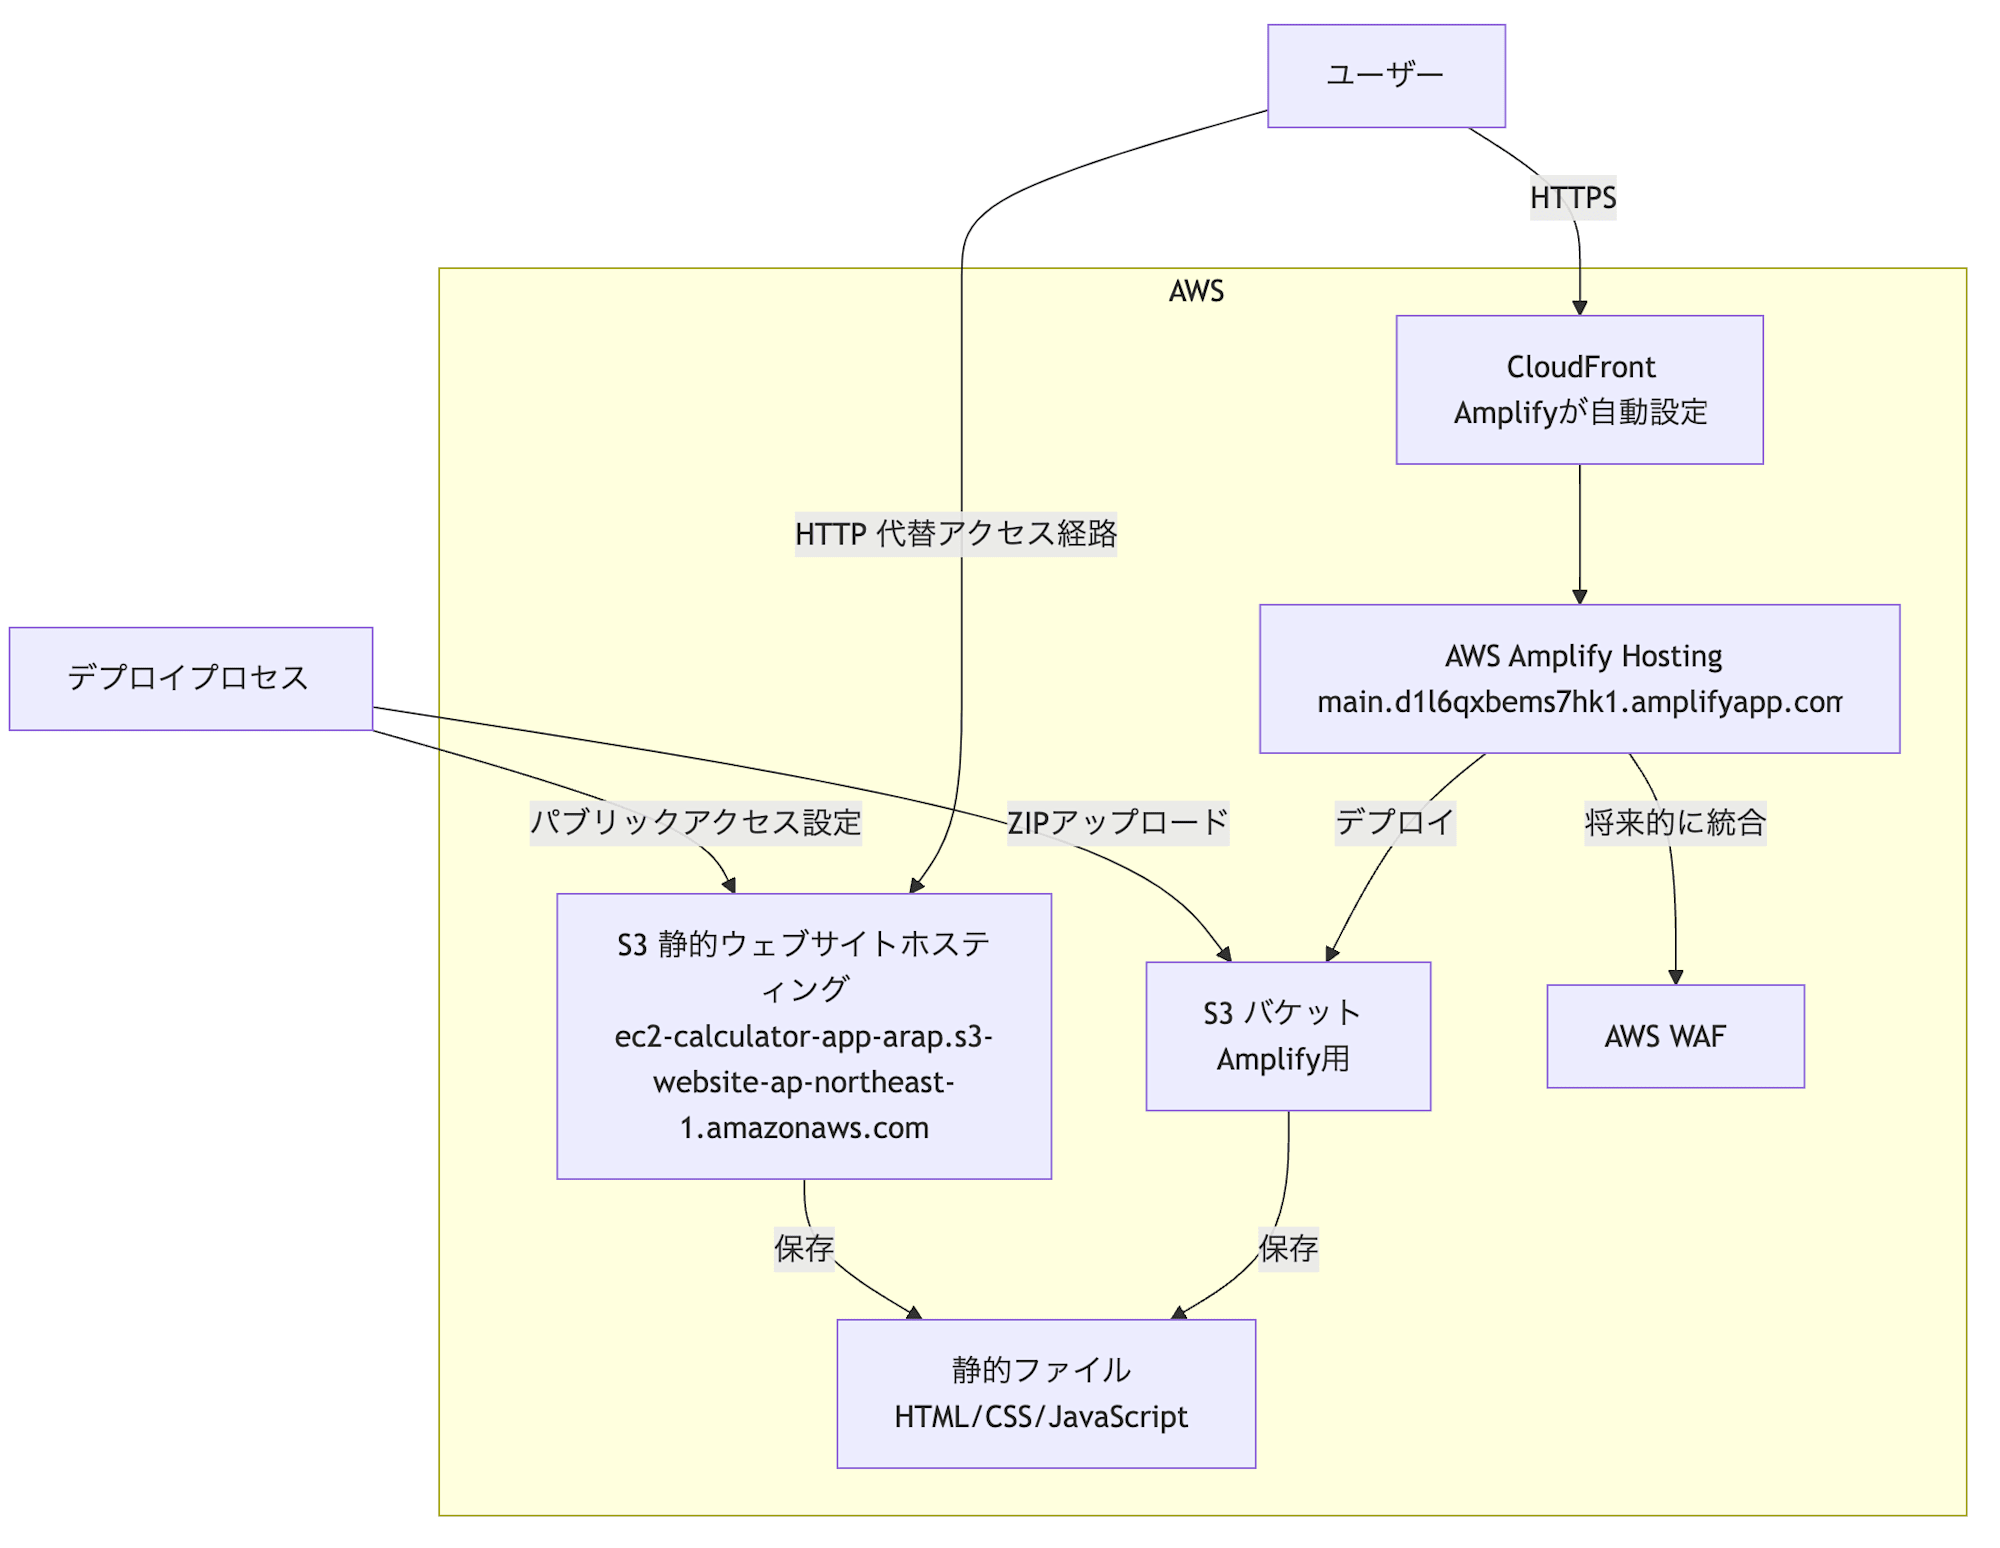
構成図も書いてくれる
ダメ元で、「今回作成した構成を構成図にしてください」とお願いしたところ、想像とは少し違ったものの、構成図を出力してくれました。
構成図は、mermaid形式でも勿論出してくれます。
> mermaid形式でお願いします

# EC2料金計算機アプリケーションの構成図 (Mermaid形式)

以下にEC2料金計算機アプリケーションの構成をMermaid形式で示します。

mermaid
graph TD
    User[ユーザー] -->|HTTPS| CloudFront
    User -->|HTTP 代替アクセス経路| S3Direct

    subgraph AWS
        CloudFront[CloudFront<br>Amplifyが自動設定] --> AmplifyHosting
        AmplifyHosting[AWS Amplify Hosting<br>main.d1l6qxbems7hk1.amplifyapp.com] -->|デプロイ| AmplifyS3
        AmplifyS3[S3 バケット<br>Amplify用] -->|保存| StaticFiles

        S3Direct[S3 静的ウェブサイトホスティング<br>ec2-calculator-app-arap.s3-website-ap-northeast-1.amazonaws.com] -->|保存| StaticFiles

        StaticFiles[静的ファイル<br>HTML/CSS/JavaScript]

        AmplifyHosting -->|将来的に統合| WAF[AWS WAF]
    end

    DeployProcess[デプロイプロセス] -->|ZIPアップロード| AmplifyS3
    DeployProcess -->|パブリックアクセス設定| S3Direct

    class AmplifyHosting,CloudFront,WAF highlight
    class User,DeployProcess external
取り出すと以下のような図になりました。ちょっと無駄が多い気もしますが、与えるプロンプト次第で何とでもなるはずです。
おわりに
Amazon Q Developer CLIにて、日本語による対話コーディングを試してみました。簡単なアプリケーションならサクッと作れて公開までできますし、Amazon Qが自身でエラー解消まで行ってくれるので、大変便利です。
「Thinking...」でぐるぐる考えているところを見ると応援したくなるので、是非試してみてください。
Amazon Q Developer CLIが意外と強力で、他のAIサービスより優先して採用されるケースもあるかもしれません!
このエントリが誰かの助けになれば幸いです。
それでは、クラウド事業本部 コンサルティング部の荒平がお送りしました!
参考
おまけ
セッション終了前に、「このセッションで作成したものをAWS上から削除して」とすると、いい感じにトレースして削除までしてくれます。料金が気になる方は実施しておきましょう。
AWS上にアップロードしたリソースを正常に削除しました。以下に削除したリソースの詳細をまとめます:

## 削除したリソース

### 1. AWS Amplifyアプリケーション
• **アプリ名**: EC2CalculatorApp
• **アプリID**: d1l6qxbems7hk1
• **ドメイン**: d1l6qxbems7hk1.amplifyapp.com
• **ブランチ**: main

### 2. S3バケットとそのコンテンツ
• **バケット名**: ec2-calculator-app-arap
• **削除したオブジェクト**:
  • index.html (21,057 バイト)
  • ec2-calculator.zip (4,802 バイト)
• **削除した設定**:
  • 静的ウェブサイトホスティング設定
  • バケットポリシー(パブリックアクセス許可とAmplifyアクセス許可)

### 3. ローカルの一時ファイル
• /tmp/ec2-app ディレクトリ
• /tmp/ec2-app.zip ファイル

## 削除プロセスの概要

1. Amplifyアプリケーションの削除
   • delete-app コマンドを使用してアプリケーション全体を削除

2. S3バケットのクリーンアップ
   • バケット内のすべてのオブジェクトを削除
   • 静的ウェブサイトホスティング設定を削除
   • バケットポリシーを削除
   • 最後にバケット自体を削除

3. ローカルの一時ファイルの削除
   • デプロイに使用した一時ファイルとディレクトリを削除

これですべてのリソースが正常に削除され、クリーンアップが完了しました。AWS環境に不要なリソースは残っていません。
おまけ2
今回作成したサンプルアプリケーションを貼っておきます。結構しっかりとした電卓です。
サンプルアプリケーション(590 lines)
<!DOCTYPE html>
<html lang="ja">
<head>
<meta charset="UTF-8">
<meta name="viewport" content="width=device-width, initial-scale=1.0">
<title>AWS EC2 料金計算機</title>
<style>
* {
box-sizing: border-box;
margin: 0;
padding: 0;
font-family: -apple-system, BlinkMacSystemFont, "Segoe UI", Roboto, Helvetica, Arial, sans-serif;
}
body {
display: flex;
justify-content: center;
align-items: center;
min-height: 100vh;
background-color: #f5f5f5;
padding: 20px;
}
.calculator-container {
width: 100%;
max-width: 800px;
background-color: #fff;
border-radius: 10px;
box-shadow: 0 5px 15px rgba(0, 0, 0, 0.1);
padding: 20px;
}
h1 {
text-align: center;
margin-bottom: 20px;
color: #232f3e;
font-size: 24px;
}
.tabs {
display: flex;
margin-bottom: 20px;
border-bottom: 1px solid #ddd;
}
.tab {
padding: 10px 20px;
cursor: pointer;
background-color: #f9f9f9;
border: 1px solid #ddd;
border-bottom: none;
border-radius: 5px 5px 0 0;
margin-right: 5px;
}
.tab.active {
background-color: #fff;
border-bottom: 1px solid #fff;
margin-bottom: -1px;
font-weight: bold;
color: #ff9900;
}
.tab-content {
display: none;
}
.tab-content.active {
display: block;
}
/* 通常の電卓スタイル */
.calculator {
width: 100%;
max-width: 320px;
margin: 0 auto;
}
.calculator-display {
width: 100%;
margin-bottom: 20px;
}
#display {
width: 100%;
height: 60px;
border: none;
background-color: #f9f9f9;
border-radius: 5px;
text-align: right;
font-size: 28px;
padding: 10px;
box-shadow: inset 0 2px 5px rgba(0, 0, 0, 0.1);
}
.calculator-keys {
display: grid;
grid-template-columns: repeat(4, 1fr);
grid-gap: 10px;
}
button {
height: 60px;
border: none;
border-radius: 5px;
font-size: 20px;
cursor: pointer;
transition: all 0.2s;
}
button:hover {
opacity: 0.8;
}
button:active {
transform: scale(0.95);
}
.key-number {
background-color: #e9e9e9;
color: #333;
}
.key-operator {
background-color: #f0ad4e;
color: white;
}
.key-equals {
background-color: #5cb85c;
color: white;
grid-row: span 2;
}
.key-clear {
background-color: #d9534f;
color: white;
}
.key-decimal {
background-color: #e9e9e9;
color: #333;
}
.key-zero {
grid-column: span 2;
}
/* EC2料金計算機スタイル */
.ec2-calculator {
width: 100%;
}
.form-group {
margin-bottom: 15px;
}
label {
display: block;
margin-bottom: 5px;
font-weight: bold;
}
select, input {
width: 100%;
padding: 10px;
border: 1px solid #ddd;
border-radius: 5px;
font-size: 16px;
}
.calculate-btn {
background-color: #ff9900;
color: white;
padding: 10px 20px;
border: none;
border-radius: 5px;
font-size: 16px;
cursor: pointer;
width: 100%;
margin-top: 10px;
}
.result {
margin-top: 20px;
padding: 15px;
background-color: #f9f9f9;
border-radius: 5px;
border-left: 5px solid #ff9900;
}
.result h3 {
margin-bottom: 10px;
color: #232f3e;
}
.price-table {
width: 100%;
border-collapse: collapse;
margin-top: 15px;
}
.price-table th, .price-table td {
padding: 8px;
text-align: left;
border-bottom: 1px solid #ddd;
}
.price-table th {
background-color: #f2f2f2;
}
.aws-logo {
width: 100px;
margin: 0 auto 20px;
display: block;
}
</style>
</head>
<body>
<div class="calculator-container">
<img src="https://a0.awsstatic.com/libra-css/images/logos/aws_logo_smile_1200x630.png" alt="AWS Logo" class="aws-logo">
<h1>AWS EC2 料金計算機</h1>
<div class="tabs">
<div class="tab active" data-tab="standard">標準電卓</div>
<div class="tab" data-tab="ec2">EC2料金計算</div>
</div>
<div id="standard-calculator" class="tab-content active">
<div class="calculator">
<div class="calculator-display">
<input type="text" id="display" readonly>
</div>
<div class="calculator-keys">
<button class="key-clear" id="clear">C</button>
<button class="key-operator" id="backspace">←</button>
<button class="key-operator" id="divide">÷</button>
<button class="key-operator" id="multiply">×</button>
<button class="key-number" id="seven">7</button>
<button class="key-number" id="eight">8</button>
<button class="key-number" id="nine">9</button>
<button class="key-operator" id="subtract">-</button>
<button class="key-number" id="four">4</button>
<button class="key-number" id="five">5</button>
<button class="key-number" id="six">6</button>
<button class="key-operator" id="add">+</button>
<button class="key-number" id="one">1</button>
<button class="key-number" id="two">2</button>
<button class="key-number" id="three">3</button>
<button class="key-equals" id="equals">=</button>
<button class="key-number key-zero" id="zero">0</button>
<button class="key-decimal" id="decimal">.</button>
</div>
</div>
</div>
<div id="ec2-calculator" class="tab-content">
<div class="ec2-calculator">
<div class="form-group">
<label for="instance-type">インスタンスタイプ:</label>
<select id="instance-type">
<option value="t3.micro">t3.micro (2 vCPU, 1 GiB RAM)</option>
<option value="t3.small">t3.small (2 vCPU, 2 GiB RAM)</option>
<option value="t3.medium">t3.medium (2 vCPU, 4 GiB RAM)</option>
<option value="m5.large">m5.large (2 vCPU, 8 GiB RAM)</option>
<option value="m5.xlarge">m5.xlarge (4 vCPU, 16 GiB RAM)</option>
<option value="c5.large">c5.large (2 vCPU, 4 GiB RAM)</option>
<option value="c5.xlarge">c5.xlarge (4 vCPU, 8 GiB RAM)</option>
<option value="r5.large">r5.large (2 vCPU, 16 GiB RAM)</option>
</select>
</div>
<div class="form-group">
<label for="hours-per-day">1日あたりの稼働時間:</label>
<input type="number" id="hours-per-day" min="1" max="24" value="24">
</div>
<div class="form-group">
<label for="days-per-month">1ヶ月あたりの稼働日数:</label>
<input type="number" id="days-per-month" min="1" max="31" value="30">
</div>
<button id="calculate-ec2" class="calculate-btn">計算する</button>
<div id="result" class="result" style="display: none;">
<h3>計算結果</h3>
<div id="result-content"></div>
</div>
</div>
</div>
</div>
<script>
// タブ切り替え機能
document.addEventListener('DOMContentLoaded', function() {
const tabs = document.querySelectorAll('.tab');
const tabContents = document.querySelectorAll('.tab-content');
tabs.forEach(tab => {
tab.addEventListener('click', () => {
const tabId = tab.getAttribute('data-tab');
// タブのアクティブ状態を切り替え
tabs.forEach(t => t.classList.remove('active'));
tab.classList.add('active');
// コンテンツの表示を切り替え
tabContents.forEach(content => {
content.classList.remove('active');
});
document.getElementById(tabId + '-calculator').classList.add('active');
});
});
// 標準電卓の機能
const display = document.getElementById('display');
const keys = document.querySelector('.calculator-keys');
let displayValue = '0';
let firstOperand = null;
let waitingForSecondOperand = false;
let operator = null;
// 表示を更新する関数
function updateDisplay() {
display.value = displayValue;
}
// 数字キーが押されたときの処理
function inputDigit(digit) {
if (waitingForSecondOperand === true) {
displayValue = digit;
waitingForSecondOperand = false;
} else {
// 表示が '0' の場合は置き換え、それ以外は追加
displayValue = displayValue === '0' ? digit : displayValue + digit;
}
}
// 小数点が押されたときの処理
function inputDecimal() {
// 既に小数点がある場合は何もしない
if (!displayValue.includes('.')) {
displayValue += '.';
}
// 演算子入力後の場合は '0.' から始める
if (waitingForSecondOperand) {
displayValue = '0.';
waitingForSecondOperand = false;
}
}
// 演算子が押されたときの処理
function handleOperator(nextOperator) {
const inputValue = parseFloat(displayValue);
// 演算子が連続で押された場合は新しい演算子に置き換え
if (operator && waitingForSecondOperand) {
operator = nextOperator;
return;
}
// 最初の数値入力の場合
if (firstOperand === null) {
firstOperand = inputValue;
} else if (operator) {
// 計算実行
const result = calculate(firstOperand, inputValue, operator);
displayValue = String(result);
firstOperand = result;
}
waitingForSecondOperand = true;
operator = nextOperator;
}
// 計算を実行する関数
function calculate(firstOperand, secondOperand, operator) {
switch (operator) {
case '+':
return firstOperand + secondOperand;
case '-':
return firstOperand - secondOperand;
case '×':
return firstOperand * secondOperand;
case '÷':
return secondOperand === 0 ? '割り算エラー' : firstOperand / secondOperand;
default:
return secondOperand;
}
}
// クリアボタンが押されたときの処理
function resetCalculator() {
displayValue = '0';
firstOperand = null;
waitingForSecondOperand = false;
operator = null;
}
// バックスペースボタンが押されたときの処理
function backspace() {
if (displayValue.length > 1) {
displayValue = displayValue.slice(0, -1);
} else {
displayValue = '0';
}
}
// イベントリスナーの設定
keys.addEventListener('click', (event) => {
const { target } = event;
// ボタン以外がクリックされた場合は何もしない
if (!target.matches('button')) {
return;
}
// 演算子ボタン
if (target.classList.contains('key-operator')) {
if (target.id === 'backspace') {
backspace();
} else {
const operatorMap = {
'add': '+',
'subtract': '-',
'multiply': '×',
'divide': '÷'
};
handleOperator(operatorMap[target.id]);
}
updateDisplay();
return;
}
// イコールボタン
if (target.classList.contains('key-equals')) {
if (operator && !waitingForSecondOperand) {
const secondOperand = parseFloat(displayValue);
const result = calculate(firstOperand, secondOperand, operator);
displayValue = String(result);
firstOperand = result;
waitingForSecondOperand = true;
operator = null;
}
updateDisplay();
return;
}
// クリアボタン
if (target.classList.contains('key-clear')) {
resetCalculator();
updateDisplay();
return;
}
// 小数点ボタン
if (target.classList.contains('key-decimal')) {
inputDecimal();
updateDisplay();
return;
}
// 数字ボタン
if (target.classList.contains('key-number')) {
inputDigit(target.textContent);
updateDisplay();
}
});
// キーボード入力のサポート
document.addEventListener('keydown', (event) => {
const key = event.key;
// 数字キー
if (/^[0-9]$/.test(key)) {
event.preventDefault();
inputDigit(key);
updateDisplay();
}
// 演算子キー
if (['+', '-', '*', '/'].includes(key)) {
event.preventDefault();
const operatorMap = {
'+': '+',
'-': '-',
'*': '×',
'/': '÷'
};
handleOperator(operatorMap[key]);
updateDisplay();
}
// イコールキーとEnterキー
if (key === '=' || key === 'Enter') {
event.preventDefault();
if (operator && !waitingForSecondOperand) {
const secondOperand = parseFloat(displayValue);
const result = calculate(firstOperand, secondOperand, operator);
displayValue = String(result);
firstOperand = result;
waitingForSecondOperand = true;
operator = null;
}
updateDisplay();
}
// 小数点キー
if (key === '.') {
event.preventDefault();
inputDecimal();
updateDisplay();
}
// バックスペースキー
if (key === 'Backspace') {
event.preventDefault();
backspace();
updateDisplay();
}
// Escapeキー(クリア)
if (key === 'Escape') {
event.preventDefault();
resetCalculator();
updateDisplay();
}
});
// 初期表示
updateDisplay();
// EC2料金計算機能
const calculateButton = document.getElementById('calculate-ec2');
const resultDiv = document.getElementById('result');
const resultContent = document.getElementById('result-content');
// 東京リージョンのEC2インスタンス料金(Linux, オンデマンド)
const ec2Prices = {
't3.micro': 0.0126, // 1時間あたりの料金(USD)
't3.small': 0.0252,
't3.medium': 0.0504,
'm5.large': 0.124,
'm5.xlarge': 0.248,
'c5.large': 0.106,
'c5.xlarge': 0.212,
'r5.large': 0.166
};
calculateButton.addEventListener('click', () => {
const instanceType = document.getElementById('instance-type').value;
const hoursPerDay = parseInt(document.getElementById('hours-per-day').value);
const daysPerMonth = parseInt(document.getElementById('days-per-month').value);
// 入力値の検証
if (hoursPerDay < 1 || hoursPerDay > 24 || daysPerMonth < 1 || daysPerMonth > 31) {
alert('有効な時間と日数を入力してください');
return;
}
const hourlyRate = ec2Prices[instanceType];
const totalHours = hoursPerDay * daysPerMonth;
const monthlyCost = hourlyRate * totalHours;
// 結果を表示
let resultHTML = `
<p><strong>インスタンスタイプ:</strong> ${instanceType}</p>
<p><strong>時間単価:</strong> $${hourlyRate.toFixed(4)} USD/時間</p>
<p><strong>稼働時間:</strong> ${hoursPerDay}時間/日 × ${daysPerMonth}日 = ${totalHours}時間/月</p>
<p><strong>月額料金:</strong> $${monthlyCost.toFixed(2)} USD (約 ${(monthlyCost * 150).toFixed(0)}円)</p>
`;
// 年間料金も表示
const yearlyCost = monthlyCost * 12;
resultHTML += `<p><strong>年間料金:</strong> $${yearlyCost.toFixed(2)} USD (約 ${(yearlyCost * 150).toFixed(0)}円)</p>`;
resultContent.innerHTML = resultHTML;
resultDiv.style.display = 'block';
});
});
</script>
</body>
</html>