検証用リソースをCloudFormationで作成してFivetran Hybrid Deploymentを試してみた
さがらです。
Fivetranには、セキュアなネットワーク内のデータソースに対応するための機能として、Hybrid Deploymentという機能が提供されています。(Hybrid Deploymentの利用には、FivetranのEnterprise以上のエディションが必要。)
このFivetran Hybrid Deploymentを実際にやってみた記事としては、以下のブログが参考になります。(当時はBeta版であったため、セットアップ用スクリプトファイルがなかったりと、現在のセットアップ手順よりも複雑なセットアップ手順となっています。)
今回、現在は一般提供となっているHybrid DeploymentをAWS環境で試すために、必要なリソースをまとめてCloudFormationで作成して検証してみたので、その内容をまとめてみます。
※CloudFormationやセットアップ時のBashコマンドについては、生成AIのサポートを得て作成しています。
SnowflakeをDestinationとして設定
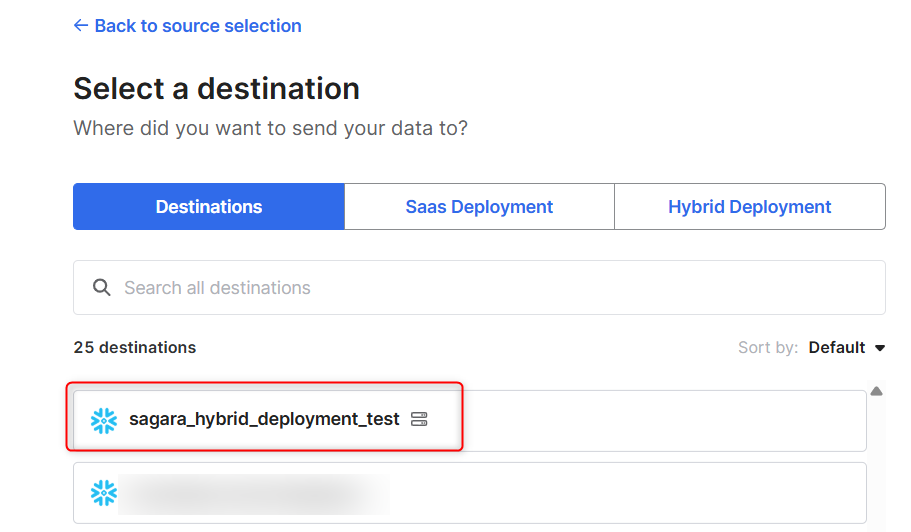
まず、FivetranでSnowflakeをDestinationとして設定します。各項目については以下の記事が参考になると思います。注意点としては、すでにSaaS Deployment(一番シンプルなFivetranのコネクタ設定~ロード)向けにSnowflakeのDestinationを設定していても、Hybrid Deploymentを使う場合は別のDestinationが必要となります。
この際、Hybrid Deploymentを使う場合に異なる点を以下に記します。
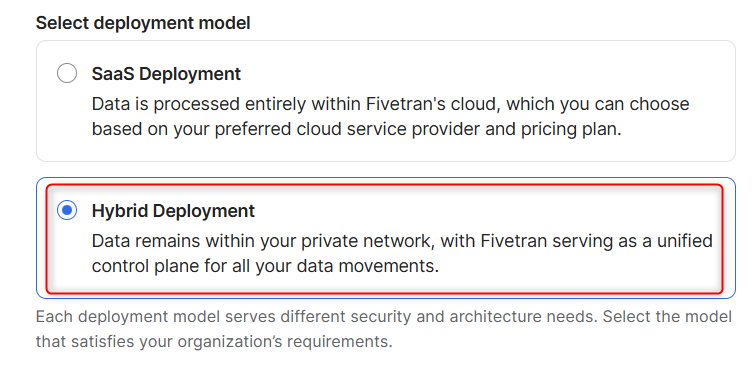
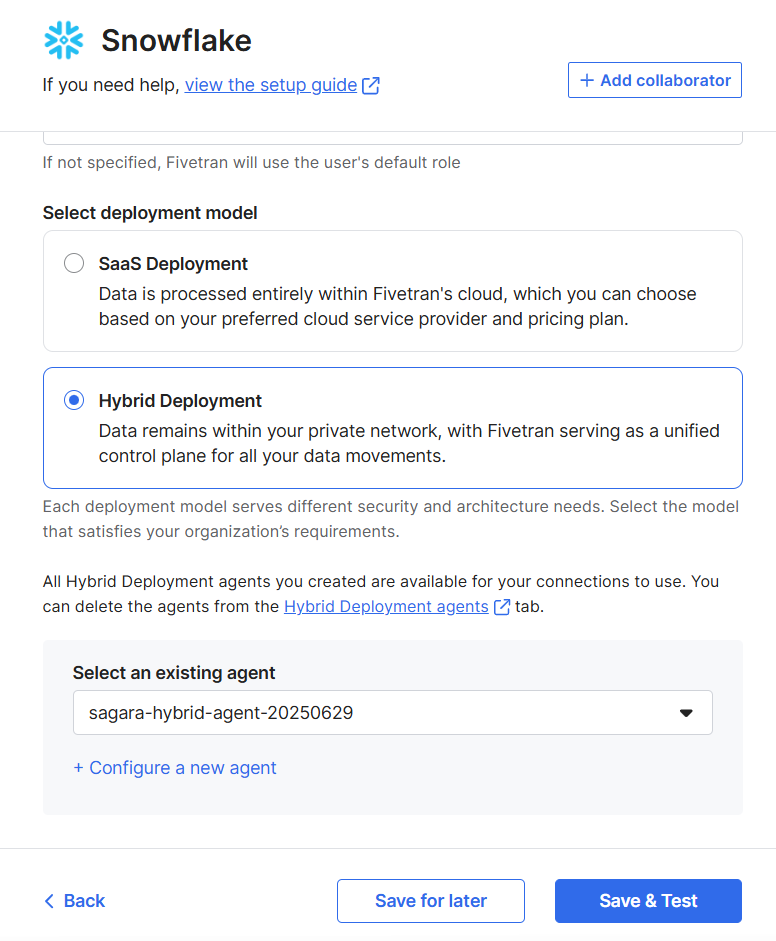
まず、Select deployment modelは、Hybrid Deploymentを選択します。
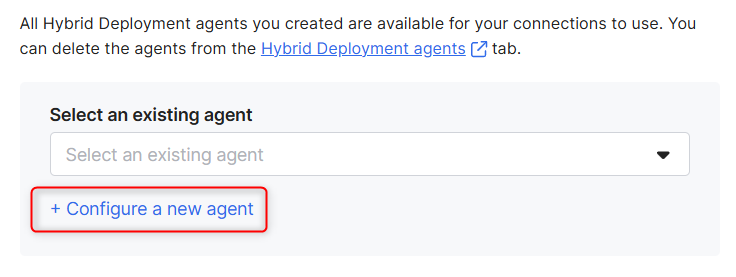
Hybrid Deploymentを選択すると、Select an existing agentという項目が追加されますので、+ Configure a new agentを押します。
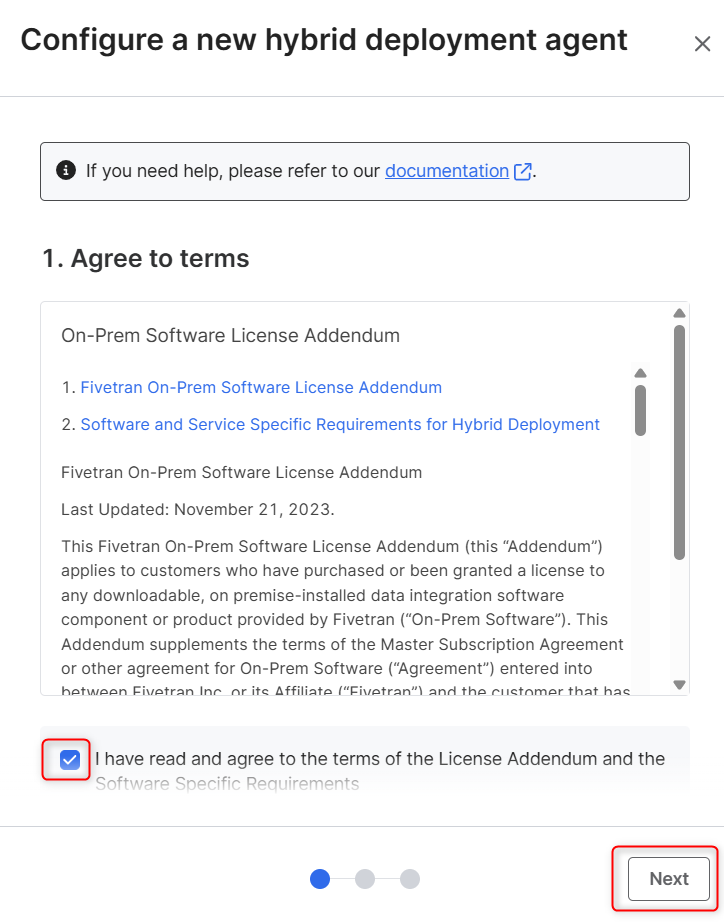
画面右側にAgree to termsが表示されますので、確認してチェックボックスにチェックをいれて、Nextを押します。
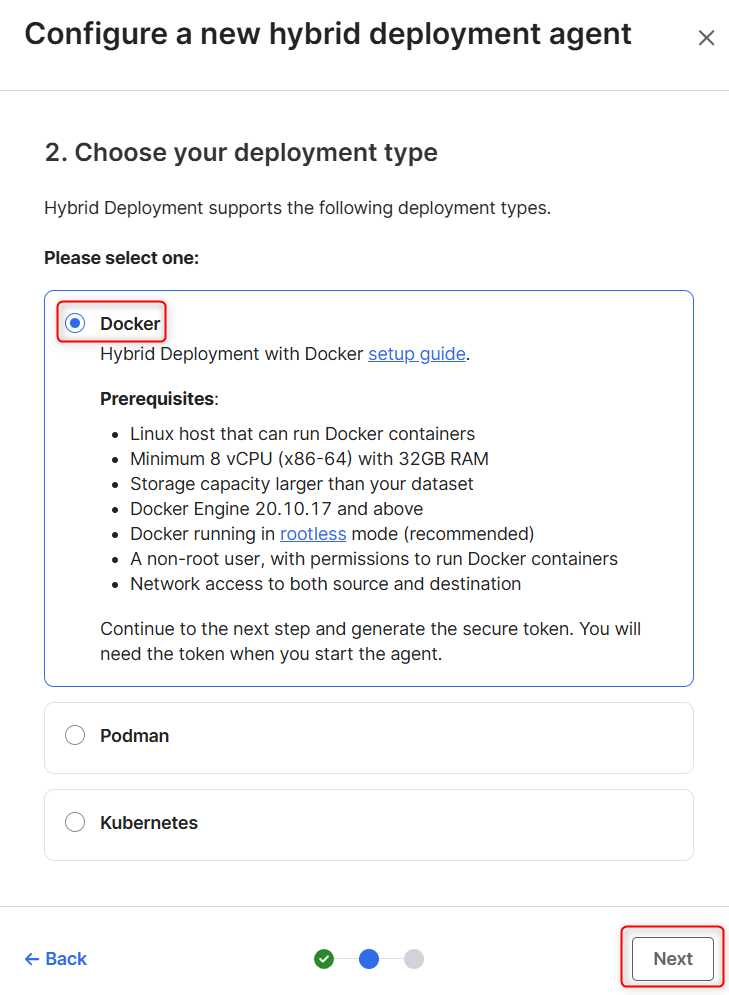
deployment typeを選択する画面となります、今回はDockerを利用するため、DockerにチェックをいれてNextを押します。
任意のエージェント名をいれて、Generate agent tokenを押します。
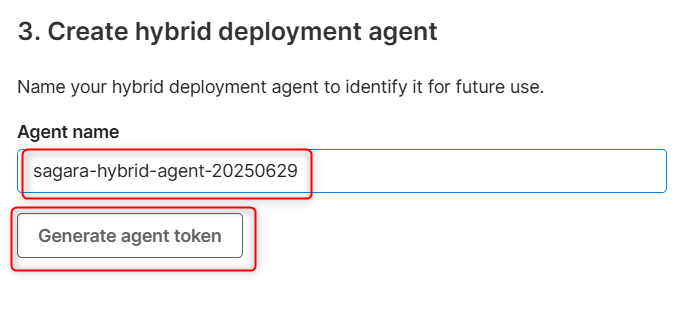
Agent tokenとInstall用のコマンドが表示されます。
これは後でEC2上で実行しますので、どちらも忘れずにコピーしておきます。コピーしたら、右下のSaveを押します。
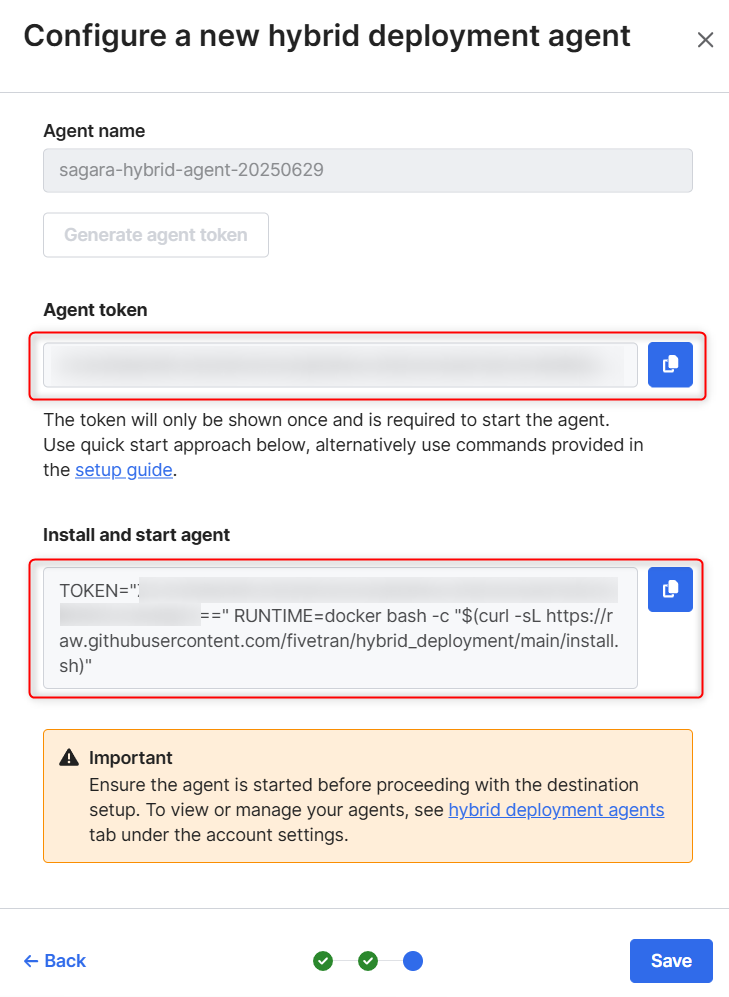
この後、エージェントのインストールと起動を行った後にこのSnowflakeのDestinationのセットアップを完了しますので、以下の画面のままブラウザ上で保持しておくように注意してください。
CloudFormationの実行
以下のCloudFormationのコードを実行します。
作成されるリソース一覧は以下です。
- ネットワーク関連
- VPC
- サブネット
- パブリックサブネット x 1
- プライベートサブネット x 2
- インターネットゲートウェイ
- ルートテーブル
- データベース関連 (Aurora PostgreSQL)
- DBクラスター
- DBインスタンス
- DBサブネットグループ
- セキュリティグループ
- EC2インスタンス関連 (Fivetranエージェントホスト)
- EC2インスタンス ※以下のコードでは「Ubuntu 24.04 LTS」が立ち上がります
- EBSボリューム
- IAMロール
- セキュリティグループ
- アクセス関連
- EC2 Instance Connect Endpoint
- S3関連 ※Hybrid DeploymentでSnowflakeをDestinationとする際、データの一時的な置き場として利用
- S3バケット
- IAMポリシー
AWSTemplateFormatVersion: '2010-09-09'
Description: >-
  Creates a complete environment with a VPC, public/private subnets, an Aurora PostgreSQL database, and an EC2 instance.

Parameters:
  DBMasterUsername:
    Type: String
    Description: Master username for the Aurora PostgreSQL database.
    Default: fivetran_db_user

  DBMasterUserPassword:
    Type: String
    Description: Master password for the Aurora PostgreSQL database.
    NoEcho: true
    MinLength: 8
    AllowedPattern: '[a-zA-Z0-9!#$&*?~_]+'
    ConstraintDescription: Must contain only alphanumeric characters and !#$&*?~_

  AllowedSshCidr:
    Type: String
    Description: >-
      The CIDR IP range that is allowed to connect to the EC2 Instance Connect Endpoint. For security, this should be your own IP address range (e.g., 1.2.3.4/32).
    Default: 0.0.0.0/0
    AllowedPattern: '(\d{1,3})\.(\d{1,3})\.(\d{1,3})\.(\d{1,3})/(\d{1,2})'
    ConstraintDescription: Must be a valid IP CIDR range.

Resources:
  # =================================================================
  #  VPC and Networking
  # =================================================================
  VPC:
    Type: AWS::EC2::VPC
    Properties:
      CidrBlock: 10.0.0.0/16
      EnableDnsSupport: true
      EnableDnsHostnames: true
      Tags:
        - Key: Name
          Value: !Sub '${AWS::StackName}-VPC'

  InternetGateway:
    Type: AWS::EC2::InternetGateway
    Properties:
      Tags:
        - Key: Name
          Value: !Sub '${AWS::StackName}-IGW'

  VPCGatewayAttachment:
    Type: AWS::EC2::VPCGatewayAttachment
    Properties:
      VpcId: !Ref VPC
      InternetGatewayId: !Ref InternetGateway

  PublicSubnet:
    Type: AWS::EC2::Subnet
    Properties:
      VpcId: !Ref VPC
      AvailabilityZone: !Select [ 0, !GetAZs '' ]
      CidrBlock: 10.0.1.0/24
      MapPublicIpOnLaunch: true
      Tags:
        - Key: Name
          Value: !Sub '${AWS::StackName}-PublicSubnet'

  PrivateSubnet1:
    Type: AWS::EC2::Subnet
    Properties:
      VpcId: !Ref VPC
      AvailabilityZone: !Select [ 0, !GetAZs '' ]
      CidrBlock: 10.0.2.0/24
      Tags:
        - Key: Name
          Value: !Sub '${AWS::StackName}-PrivateSubnet-1'

  PrivateSubnet2:
    Type: AWS::EC2::Subnet
    Properties:
      VpcId: !Ref VPC
      AvailabilityZone: !Select [ 1, !GetAZs '' ]
      CidrBlock: 10.0.3.0/24
      Tags:
        - Key: Name
          Value: !Sub '${AWS::StackName}-PrivateSubnet-2'

  PublicRouteTable:
    Type: AWS::EC2::RouteTable
    Properties:
      VpcId: !Ref VPC
      Tags:
        - Key: Name
          Value: !Sub '${AWS::StackName}-PublicRouteTable'

  PublicRoute:
    Type: AWS::EC2::Route
    DependsOn: VPCGatewayAttachment
    Properties:
      RouteTableId: !Ref PublicRouteTable
      DestinationCidrBlock: 0.0.0.0/0
      GatewayId: !Ref InternetGateway

  PublicSubnetRouteTableAssociation:
    Type: AWS::EC2::SubnetRouteTableAssociation
    Properties:
      SubnetId: !Ref PublicSubnet
      RouteTableId: !Ref PublicRouteTable

  PrivateRouteTable:
    Type: AWS::EC2::RouteTable
    Properties:
      VpcId: !Ref VPC
      Tags:
        - Key: Name
          Value: !Sub '${AWS::StackName}-PrivateRouteTable'

  PrivateSubnet1RouteTableAssociation:
    Type: AWS::EC2::SubnetRouteTableAssociation
    Properties:
      SubnetId: !Ref PrivateSubnet1
      RouteTableId: !Ref PrivateRouteTable

  PrivateSubnet2RouteTableAssociation:
    Type: AWS::EC2::SubnetRouteTableAssociation
    Properties:
      SubnetId: !Ref PrivateSubnet2
      RouteTableId: !Ref PrivateRouteTable

  # =================================================================
  #  Aurora PostgreSQL Database
  # =================================================================
  DBSubnetGroup:
    Type: AWS::RDS::DBSubnetGroup
    Properties:
      DBSubnetGroupDescription: Subnet group for Aurora DB spanning multiple AZs
      SubnetIds:
        - !Ref PrivateSubnet1
        - !Ref PrivateSubnet2

  DBSecurityGroup:
    Type: AWS::EC2::SecurityGroup
    Properties:
      GroupDescription: Allow PostgreSQL access from Agent EC2
      VpcId: !Ref VPC
      SecurityGroupIngress:
        - IpProtocol: tcp
          FromPort: 5432
          ToPort: 5432
          SourceSecurityGroupId: !Ref AgentEC2SecurityGroup
      Tags:
        - Key: Name
          Value: !Sub '${AWS::StackName}-DB-SG'

  DBCluster:
    Type: AWS::RDS::DBCluster
    Properties:
      Engine: aurora-postgresql
      EngineVersion: '15.5'
      DatabaseName: FivetranHybridDB
      Port: 5432
      MasterUsername: !Ref DBMasterUsername
      MasterUserPassword: !Ref DBMasterUserPassword
      DBSubnetGroupName: !Ref DBSubnetGroup
      VpcSecurityGroupIds:
        - !Ref DBSecurityGroup
      StorageEncrypted: true
      Tags:
        - Key: Name
          Value: !Sub '${AWS::StackName}-DB-Cluster'

  DBInstance:
    Type: AWS::RDS::DBInstance
    Properties:
      DBClusterIdentifier: !Ref DBCluster
      Engine: aurora-postgresql
      DBInstanceClass: db.t3.medium
      PubliclyAccessible: false

  # =================================================================
  #  Agent Host EC2 Instance
  # =================================================================
  AgentEC2Role:
    Type: AWS::IAM::Role
    Properties:
      AssumeRolePolicyDocument:
        Version: "2012-10-17"
        Statement:
          - Effect: Allow
            Principal:
              Service:
                - ec2.amazonaws.com
            Action:
              - 'sts:AssumeRole'
      ManagedPolicyArns:
        - 'arn:aws:iam::aws:policy/AmazonSSMManagedInstanceCore'
      Tags:
        - Key: Name
          Value: !Sub '${AWS::StackName}-AgentEC2Role'

  AgentInstanceProfile:
    Type: AWS::IAM::InstanceProfile
    Properties:
      Roles:
        - !Ref AgentEC2Role

  AgentEC2SecurityGroup:
    Type: AWS::EC2::SecurityGroup
    Properties:
      GroupDescription: Security group for Agent EC2 Host
      VpcId: !Ref VPC
      SecurityGroupIngress:
        - IpProtocol: tcp
          FromPort: 22
          ToPort: 22
          SourceSecurityGroupId: !Ref EC2InstanceConnectEndpointSG
      SecurityGroupEgress:
        - IpProtocol: -1
          CidrIp: 0.0.0.0/0
      Tags:
        - Key: Name
          Value: !Sub '${AWS::StackName}-Agent-SG'

  AgentEC2Instance:
    Type: AWS::EC2::Instance
    Properties:
      InstanceType: m5.2xlarge
      # Amazon Linux 2023の場合
      # ImageId: '{{resolve:ssm:/aws/service/ami-amazon-linux-latest/al2023-ami-kernel-default-x86_64}}'
      # Ubuntu 24.04 LTSの場合
      ImageId: '{{resolve:ssm:/aws/service/canonical/ubuntu/server/24.04/stable/current/amd64/hvm/ebs-gp3/ami-id}}'
      IamInstanceProfile: !Ref AgentInstanceProfile
      SecurityGroupIds:
        - !Ref AgentEC2SecurityGroup
      SubnetId: !Ref PublicSubnet
      BlockDeviceMappings:
        - DeviceName: /dev/xvda
          Ebs:
            VolumeSize: 10
            VolumeType: gp3
            DeleteOnTermination: true
        - DeviceName: /dev/xvdb
          Ebs:
            VolumeSize: 50
            VolumeType: gp3
            DeleteOnTermination: true
      Tags:
        - Key: Name
          Value: !Sub '${AWS::StackName}-Agent-Host'

  # =================================================================
  #  EC2 Instance Connect Endpoint for Secure Access
  # =================================================================
  EC2InstanceConnectEndpointSG:
    Type: AWS::EC2::SecurityGroup
    Properties:
      GroupDescription: Security group for EC2 Instance Connect Endpoint
      VpcId: !Ref VPC
      SecurityGroupIngress:
        - IpProtocol: tcp
          FromPort: 443
          ToPort: 443
          CidrIp: !Ref AllowedSshCidr
      Tags:
        - Key: Name
          Value: !Sub '${AWS::StackName}-EIC-Endpoint-SG'

  EC2InstanceConnectEndpoint:
    Type: AWS::EC2::InstanceConnectEndpoint
    Properties:
      SubnetId: !Ref PublicSubnet
      SecurityGroupIds:
        - !Ref EC2InstanceConnectEndpointSG
      Tags:
        - Key: Name
          Value: !Sub '${AWS::StackName}-EIC-Endpoint'

  # =================================================================
  #  Staging S3 Bucket
  # =================================================================
  FivetranHybridStageBucket:
    Type: AWS::S3::Bucket
    Properties:
      BucketName: !Sub '${AWS::StackName}-bucket'
      BucketEncryption:
        ServerSideEncryptionConfiguration:
          - ServerSideEncryptionByDefault:
              SSEAlgorithm: AES256
      PublicAccessBlockConfiguration:
        BlockPublicAcls: true
        BlockPublicPolicy: true
        IgnorePublicAcls: true
        RestrictPublicBuckets: true
      Tags:
        - Key: Name
          Value: !Sub '${AWS::StackName}-Stage-Bucket'

  FivetranS3StagePolicy:
    Type: AWS::IAM::Policy
    Properties:
      PolicyName: !Sub '${AWS::StackName}-S3StagePolicy'
      Roles:
        - !Ref AgentEC2Role
      PolicyDocument:
        Version: "2012-10-17"
        Statement:
          - Sid: FivetranS3Access
            Effect: Allow
            Action:
              - "s3:DeleteObjectTagging"
              - "s3:ReplicateObject"
              - "s3:PutObject"
              - "s3:GetObjectAcl"
              - "s3:GetObject"
              - "s3:DeleteObjectVersion"
              - "s3:ListBucket"
              - "s3:PutObjectTagging"
              - "s3:DeleteObject"
              - "s3:PutObjectAcl"
            Resource:
              - !GetAtt FivetranHybridStageBucket.Arn
              - !Sub '${FivetranHybridStageBucket.Arn}/*'

Outputs:
  EC2InstanceId:
    Description: The Instance ID of the Agent host.
    Value: !Ref AgentEC2Instance

  EC2InstanceConnectCommand:
    Description: >-
      Run this command from your local machine (with AWS CLI configured) to connect to the instance.
    # Amazon Linux 2023の場合
    # Value: !Sub 'aws ec2-instance-connect ssh --instance-id ${AgentEC2Instance} --connection-type eice'
    # Ubuntuの場合
    Value: !Sub 'aws ec2-instance-connect ssh --instance-id ${AgentEC2Instance} --connection-type eice --os-user ubuntu'

  AuroraDBClusterEndpoint:
    Description: The connection endpoint for the Aurora DB cluster.
    Value: !GetAtt DBCluster.Endpoint.Address

  AuroraDBClusterReadEndpoint:
    Description: The read endpoint for the Aurora DB cluster.
    Value: !GetAtt DBCluster.ReadEndpoint.Address

  FivetranStageBucketName:
    Description: The name of the S3 bucket for staging.
    Value: !Ref FivetranHybridStageBucket
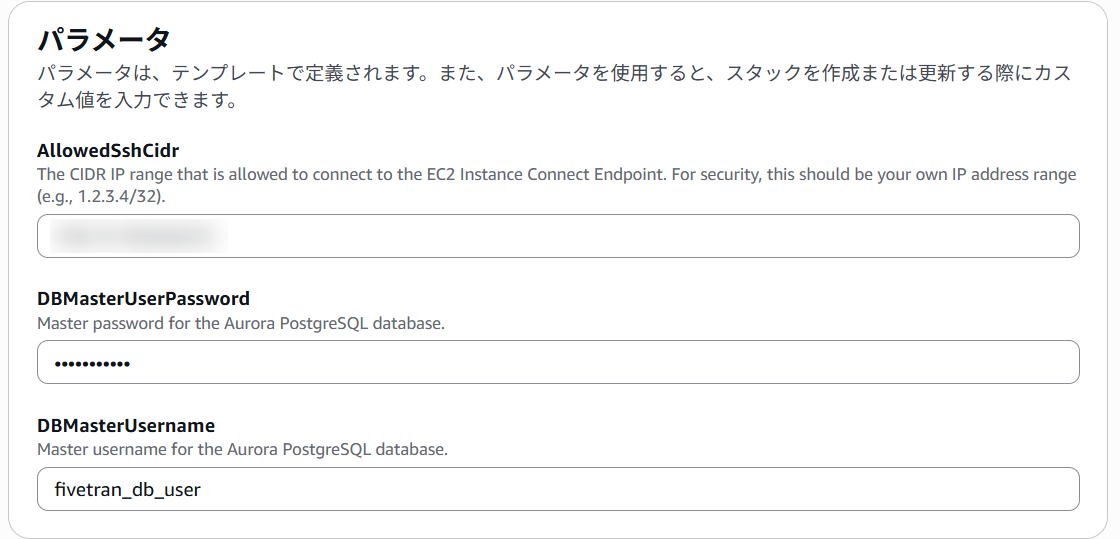
パラメータは任意の値を設定します。
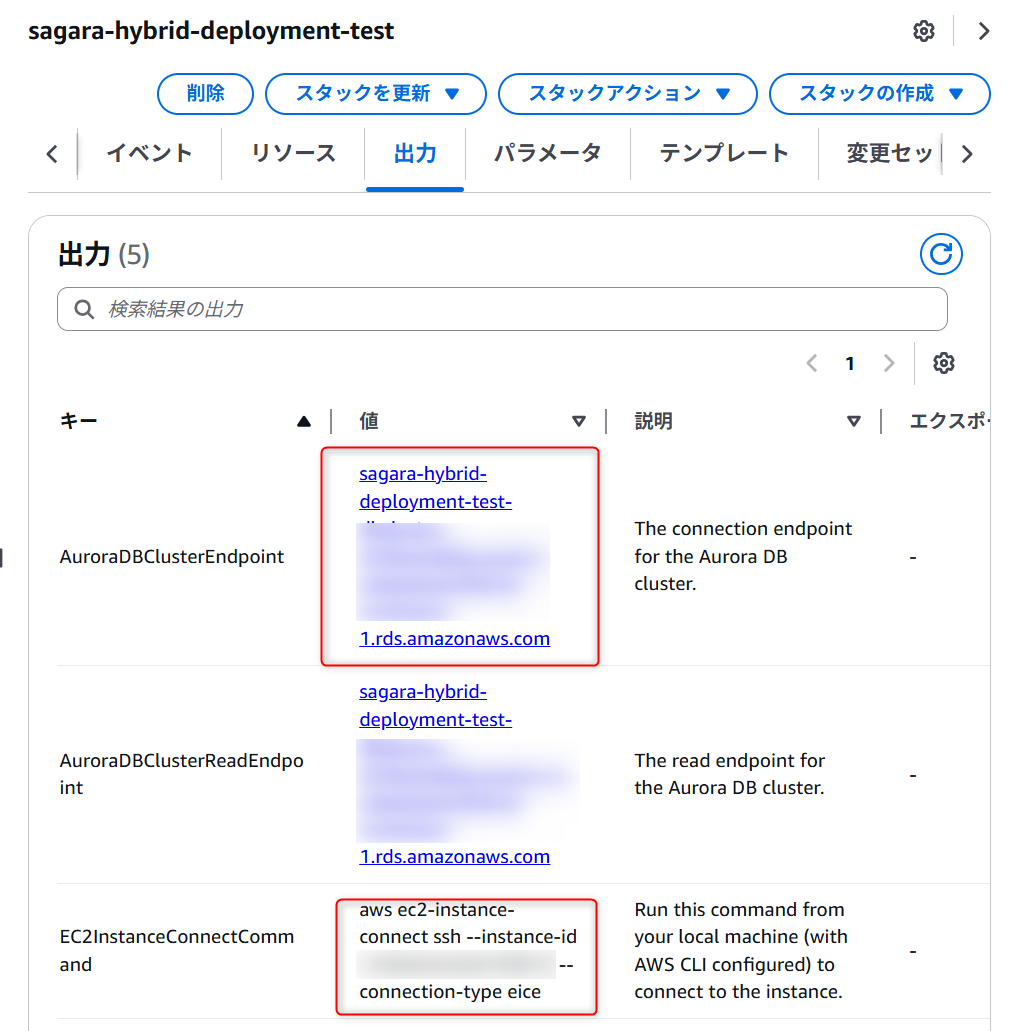
リソース作成後、出力タブから「Auroraのエンドポイントの値」と「EC2 Instance Connectでインスタンスに接続するためのコマンド」が表示されるため、控えておきます。
Aurora PostgreSQLで適当なテーブルを作成
次に、Aurora PostgreSQLで適当なテーブルを作成します。
先ほどCloudFormationの出力タブで確認した「EC2 Instance Connectでインスタンスに接続するためのコマンド」を実行します。(AWS CLIのセットアップは、別途実施済とします。)
aws ec2-instance-connect ssh --instance-id <Your-instance-id> --connection-type eice --os-user ubuntu
EC2にログインしたら、PostgreSQLに入るためpsqlをインストールします。
sudo apt update
sudo apt install -y postgresql-client
次に、psqlを使ってAurora PostgreSQLに接続します。<Your-Aurora-Endpoint>はCloudFormationの出力タブから、<Your-DB-Username>はCloudFormationでのスタック作成時の値を入れます。
実行すると、パスワードを聞かれるため、CloudFormationでのスタック作成時の値を入れます。
psql --host=<Your-Aurora-Endpoint> --port=5432 --username=<Your-DB-Username> --dbname=FivetranHybridDB
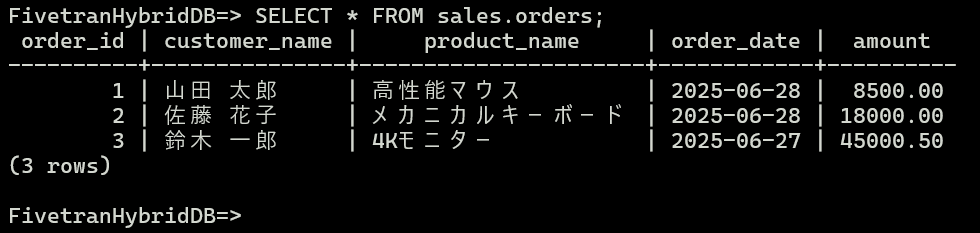
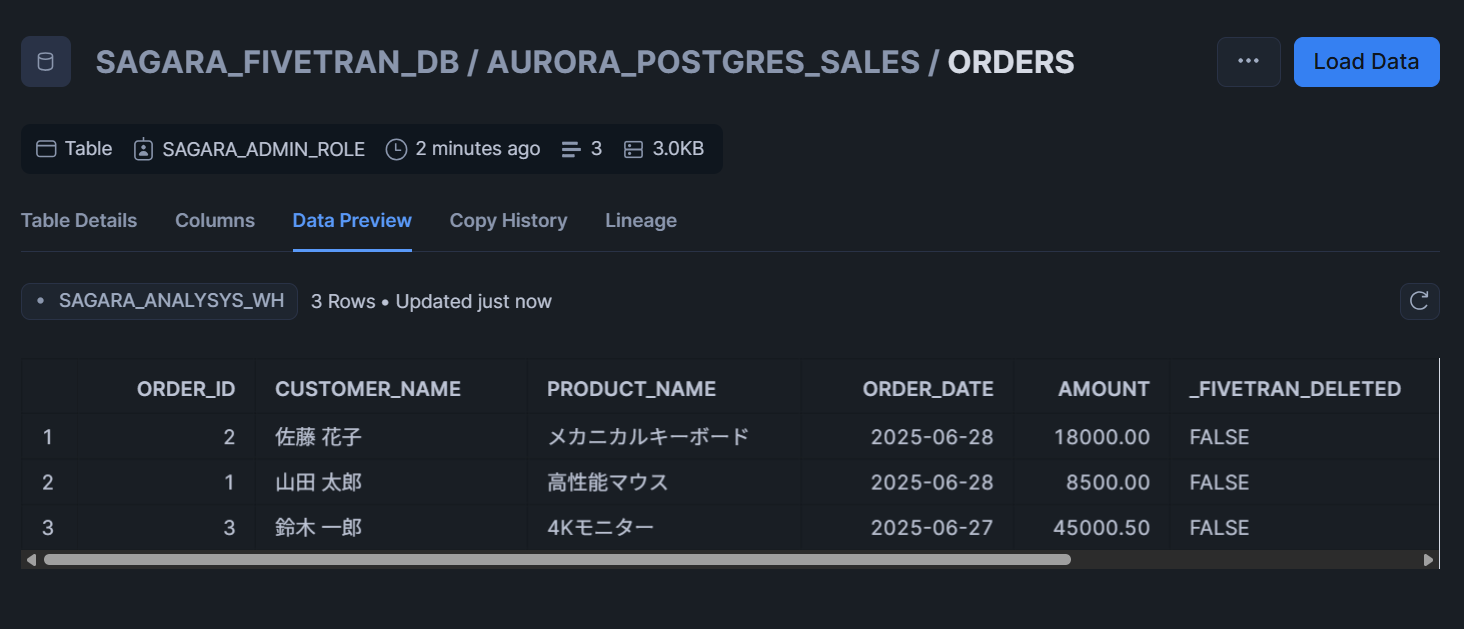
あとは、任意のテーブルを作成します。今回は私は以下のSQLを順番に実行しました。
CREATE SCHEMA sales;

CREATE TABLE sales.orders (
    order_id SERIAL PRIMARY KEY,
    customer_name VARCHAR(100) NOT NULL,
    product_name VARCHAR(100) NOT NULL,
    order_date DATE NOT NULL,
    amount NUMERIC(10, 2)
);

INSERT INTO sales.orders (customer_name, product_name, order_date, amount) VALUES
('山田 太郎', '高性能マウス', '2025-06-28', 8500.00),
('佐藤 花子', 'メカニカルキーボード', '2025-06-28', 18000.00),
('鈴木 一郎', '4Kモニター', '2025-06-27', 45000.50);

SELECT * FROM sales.orders;
このSQLを順番に実行すると、下図のように3レコード入ったテーブルが作られます。
また、今回はFivetran Teleport Syncによる変更検出を行うため、以下のクエリも実行しておきます。
CREATE AGGREGATE BIT_XOR(IN v bigint) (SFUNC = int8xor, STYPE = bigint);
テーブルを作成したら、以下のコマンドを実行してpsqlクライアントを終了します。
\q
Hybrid DeploymentのエージェントをインストールするEC2でのセットアップ
続けてEC2上で、Hybrid Deploymentのエージェントのために必要な各種準備を行います。
パッケージインストール・Fivetran専用ユーザー&グループ作成
まず、ルートユーザーで、必要なパッケージをインストールし、Fivetran専用ユーザーとグループを作成します。
# root になる
sudo -i

# 1) 依存パッケージ
apt update -y
apt install -y uidmap dbus-user-session curl xfsprogs fuse-overlayfs slirp4netns iptables nftables

# nf_tables モジュールをロード & 永続化
modprobe nf_tables
echo nf_tables | sudo tee /etc/modules-load.d/nftables.conf

# 3) fivetran ユーザ/グループ
groupadd fivetran
useradd -m -g fivetran fivetran
usermod -aG sudo fivetran    # sudo 権限付与

# 4) user-systemd を有効化(linger)
sudo loginctl enable-linger fivetran

exit                         # ubuntu ユーザへ戻る
AppArmorにrootlesskitを許可する
Ubuntu 23.10以降では「unprivileged user namespace (userns)を制限するAppArmor設定」が既定で有効になっています。
ルートレスモードのDockerが内部で呼ぶrootlesskitはusernsを利用するため、その対策を行います。
sudo -i

# テンプレート登録
sudo tee /etc/apparmor.d/home.fivetran.bin.rootlesskit >/dev/null <<'EOF'
# ref: https://ubuntu.com/blog/ubuntu-23-10-restricted-unprivileged-user-namespaces
abi <abi/4.0>,
include <tunables/global>

/home/fivetran/bin/rootlesskit flags=(unconfined) {
  userns,

  # Site-specific additions and overrides. See local/README for details.
  include if exists <local/home.fivetran.bin.rootlesskit>
}
EOF

# AppArmorを再読み込み
sudo systemctl restart apparmor.service
EBSボリュームのマウント
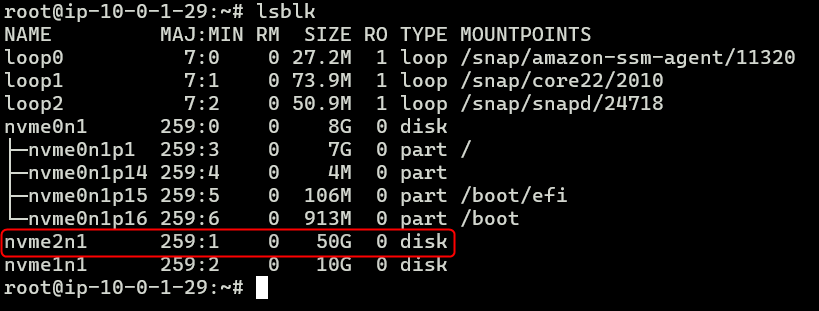
次に、EBSボリュームのマウントの作業に移ります。
もう一度ルートユーザーでログインし、マウントさせたいデバイスを確認します。下図の場合だと、nvme2n1 が該当します。
sudo -i

lsblk
確認したデバイスをフォーマットします。
mkfs.xfs -f /dev/nvme2n1
現在の.localを退避して、空のディレクトリを作成します。
su - fivetran -c 'mv ~/.local ~/.local.bak 2>/dev/null || true'
su - fivetran -c 'mkdir ~/.local'
UUIDを確認して、/etc/fstabへ追記して永続化します。
UUID=$(blkid -s UUID -o value /dev/nvme2n1)
echo "UUID=$UUID  /home/fivetran/.local  xfs  defaults  0 0" >> /etc/fstab
マウントを行い、所有権も変更します。
systemctl daemon-reload           # fstab 変更を systemd に反映
mkdir -p /home/fivetran/.local    # 無ければ作成
mount -a                          # マウント実行
chown fivetran:fivetran /home/fivetran/.local
以下のコマンドを実行して、/dev/nvme2n1がXFSとしてマウントされていれば完了です。
findmnt /home/fivetran/.local
rootでの作業は完了のため、一旦rootシェルを終了します。
exit
EC2にDockerをルートレスモードでインストール
次に、Fivetran用のユーザーに切り替えて、EC2にDockerとHybrid Deploymentのエージェントをインストールします。
まず、sshで fivetran ユーザとして直接ログインしなおします。 ※なぜか私の場合はこうしないとうまくいきませんでした…
aws ec2-instance-connect ssh --instance-id <Your-instance-id> --connection-type eice --os-user fivetran
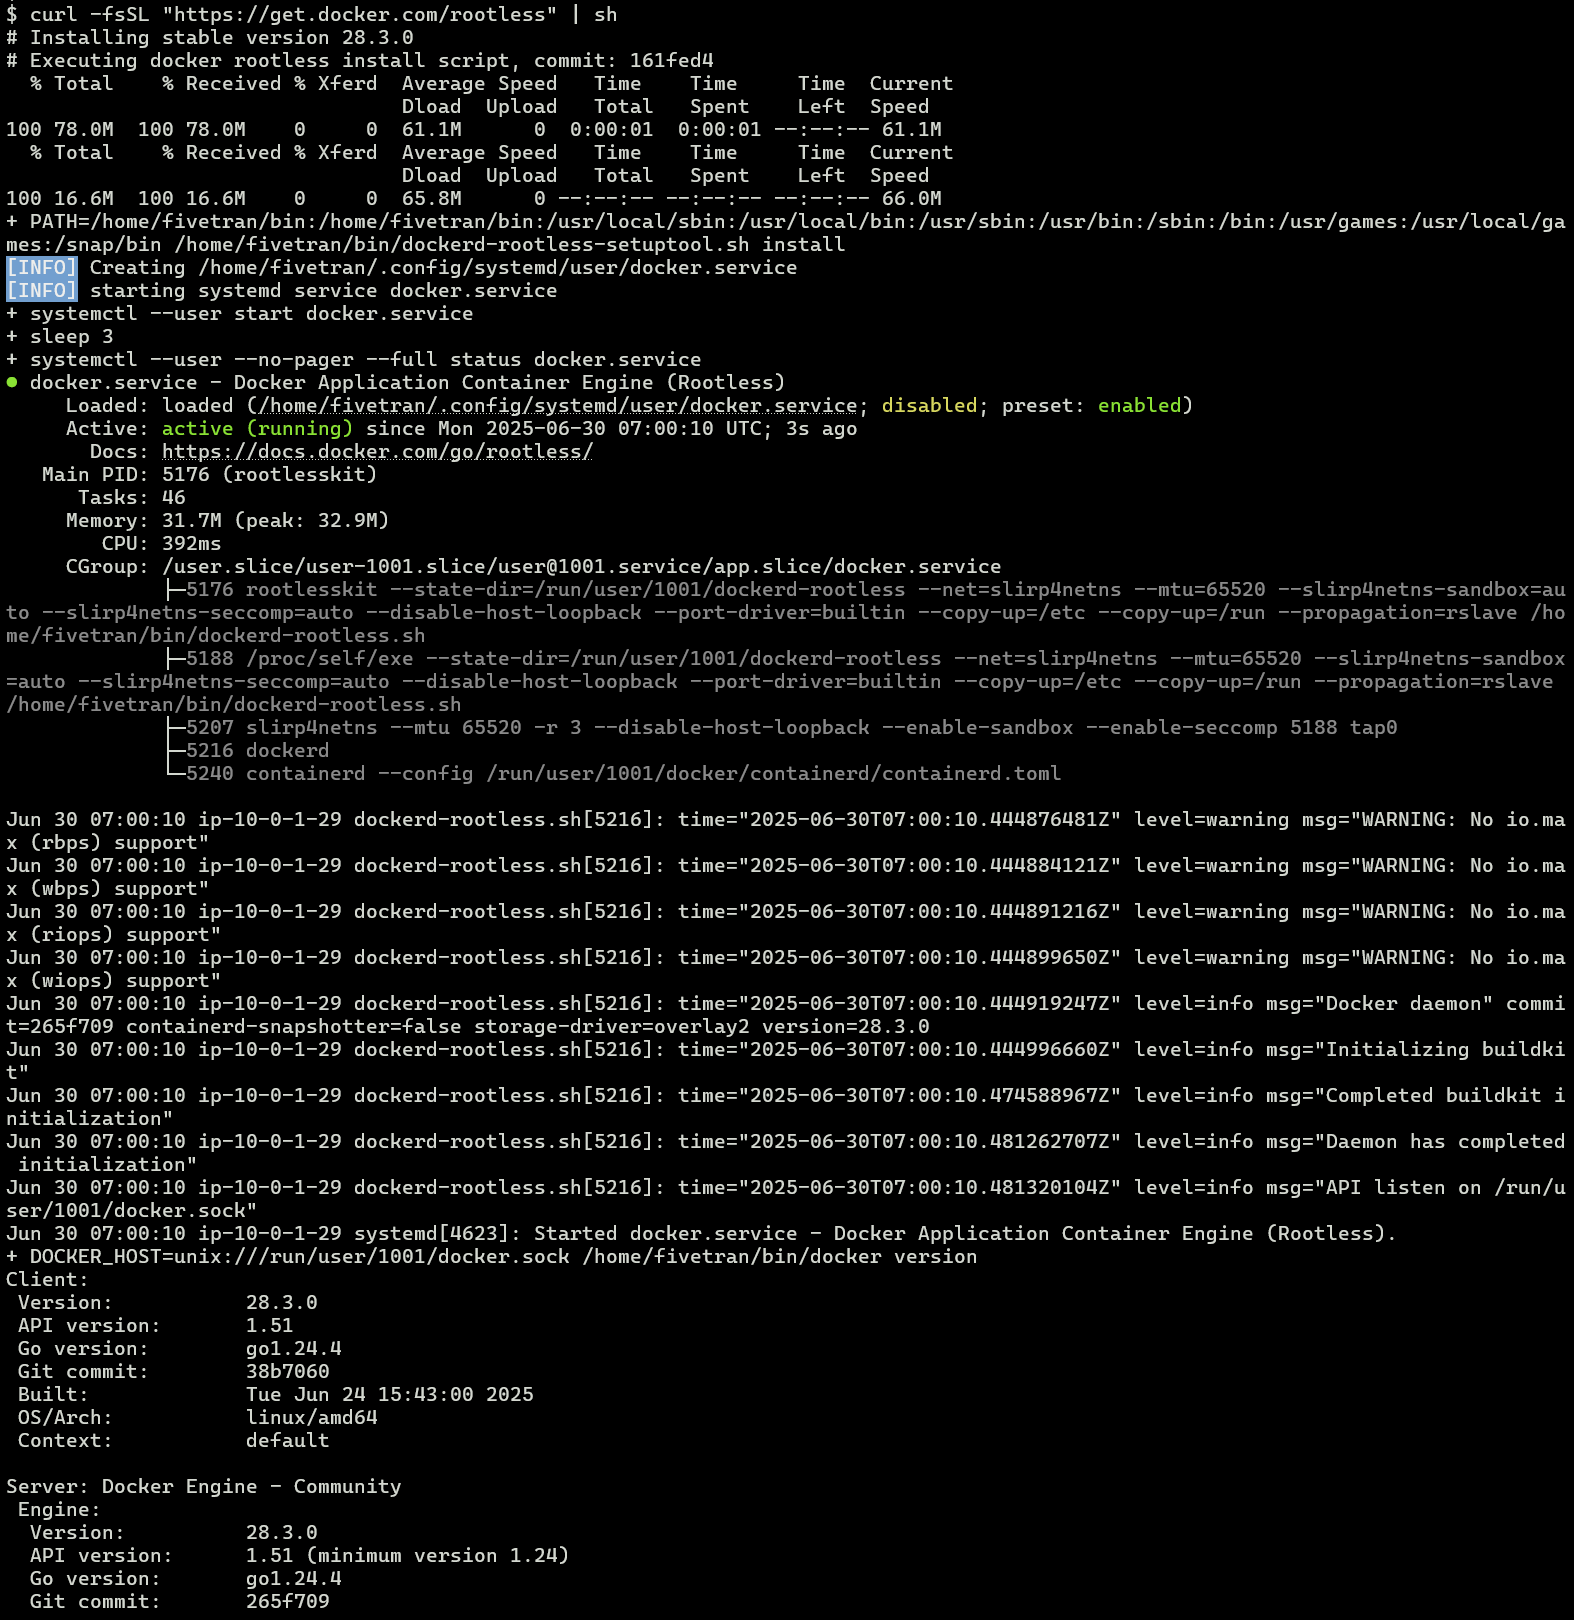
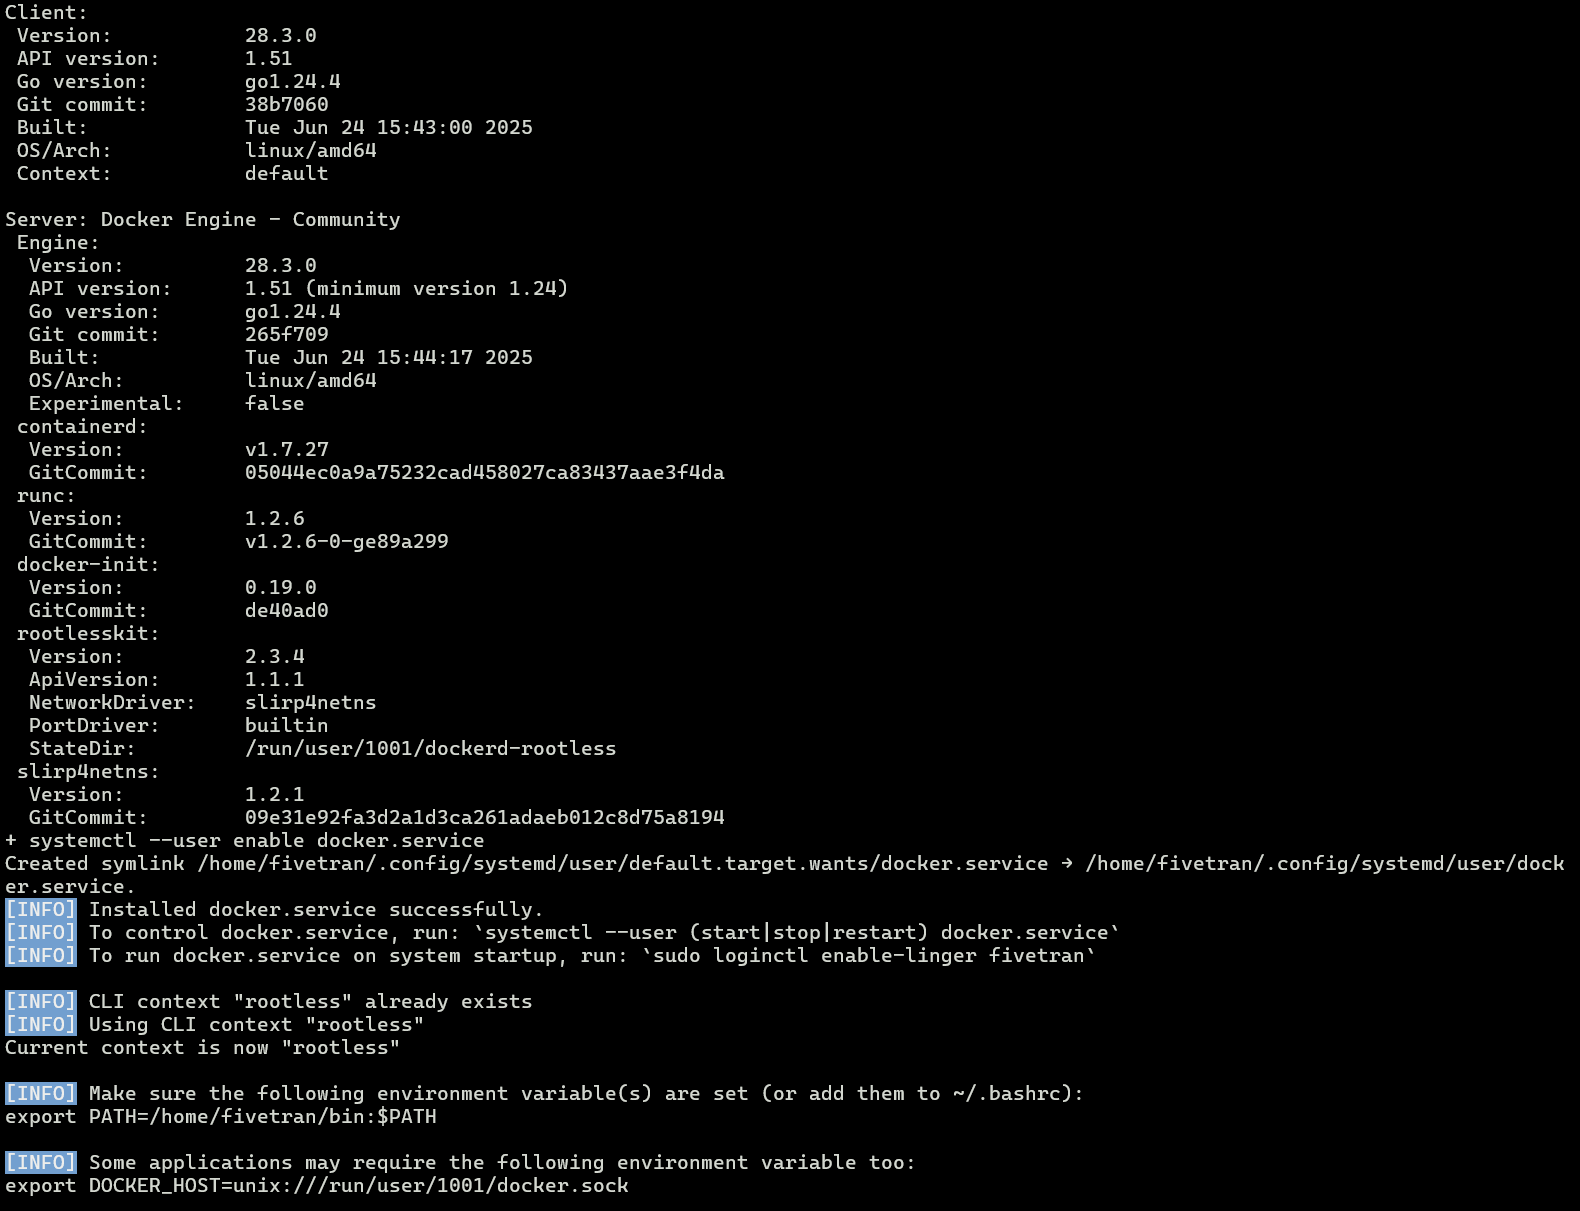
以下のコマンドを実行して、Dockerをルートレスモードでインストールします。下図のように表示されたら成功です。
curl -fsSL "https://get.docker.com/rootless" | sh
この後、環境変数を追記します。
echo 'export PATH=$HOME/bin:$PATH' >> ~/.bashrc
echo 'export DOCKER_HOST=unix:///run/user/$(id -u)/docker.sock' >> ~/.bashrc
source ~/.bashrc
現在のrootlessコンテキストを上書きします。
docker context update rootless \
  --docker "host=unix:///run/user/$(id -u)/docker.sock"
Hybrid Deploymentのエージェントをインストール
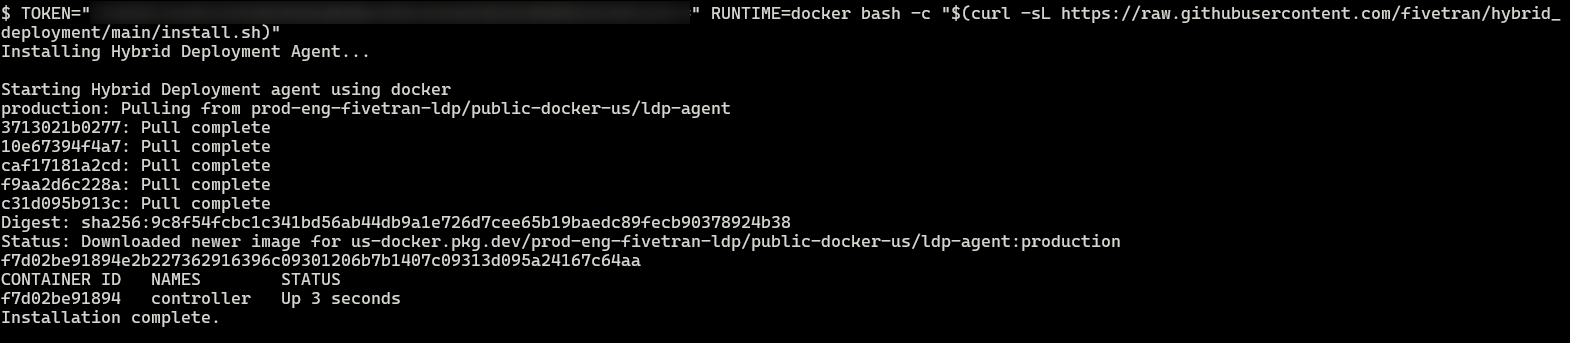
次に、Hybrid Deploymentのエージェントをインストールします。冒頭のFivetranでのSnowflakeのDestination設定画面で確認した、TOKEN=から始まるコマンドを実行します。下図のようになればインストール成功です。
TOKEN="YOUR_TOKEN_HERE" RUNTIME=docker bash -c "$(curl -sL "https://raw.githubusercontent.com/fivetran/hybrid_deployment/main/install.sh")"
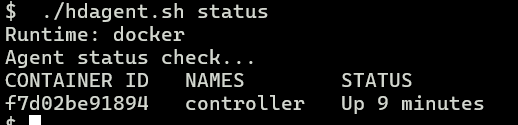
以下のコマンドでエージェントの状況を確認可能です。
cd ~/fivetran
./hdagent.sh status
SnowflakeをDestinationとして設定(続き)
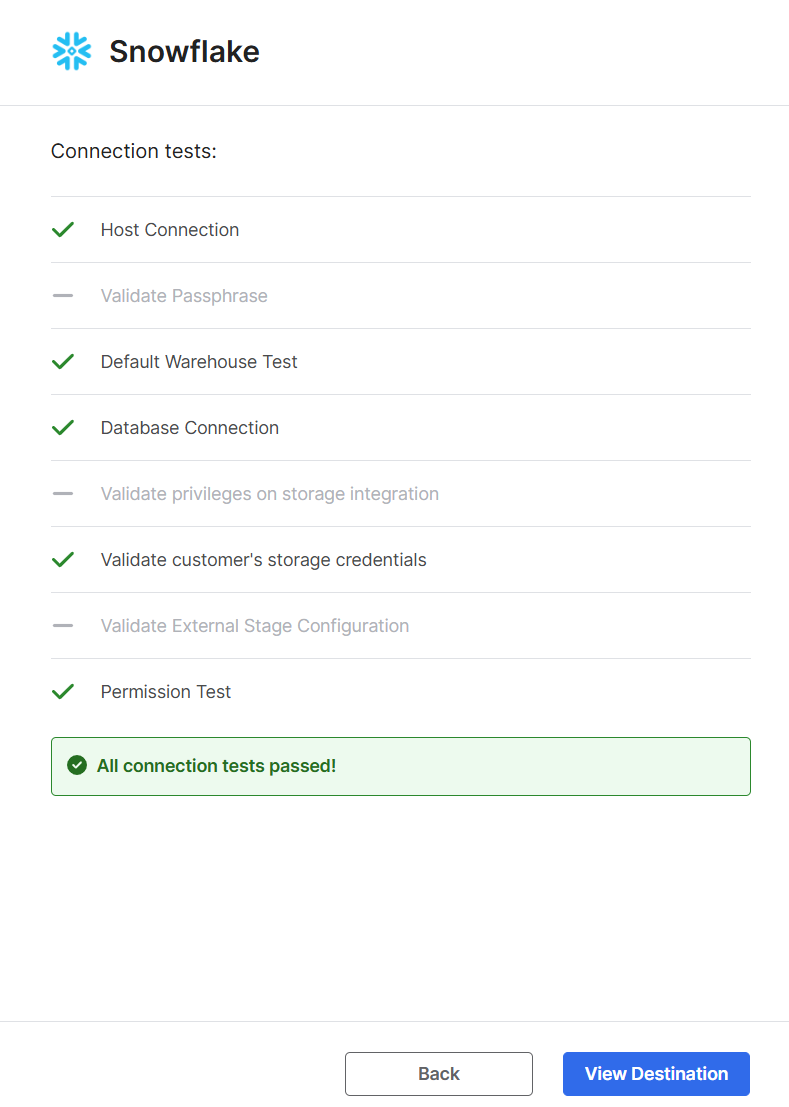
SnowflakeのDestinationの設定画面に戻り、The storage service you want to useはAWS S3を選択して、Authentication typeはIAM_ROLEとし、バケット名なども入れて、Save & Testを押します。
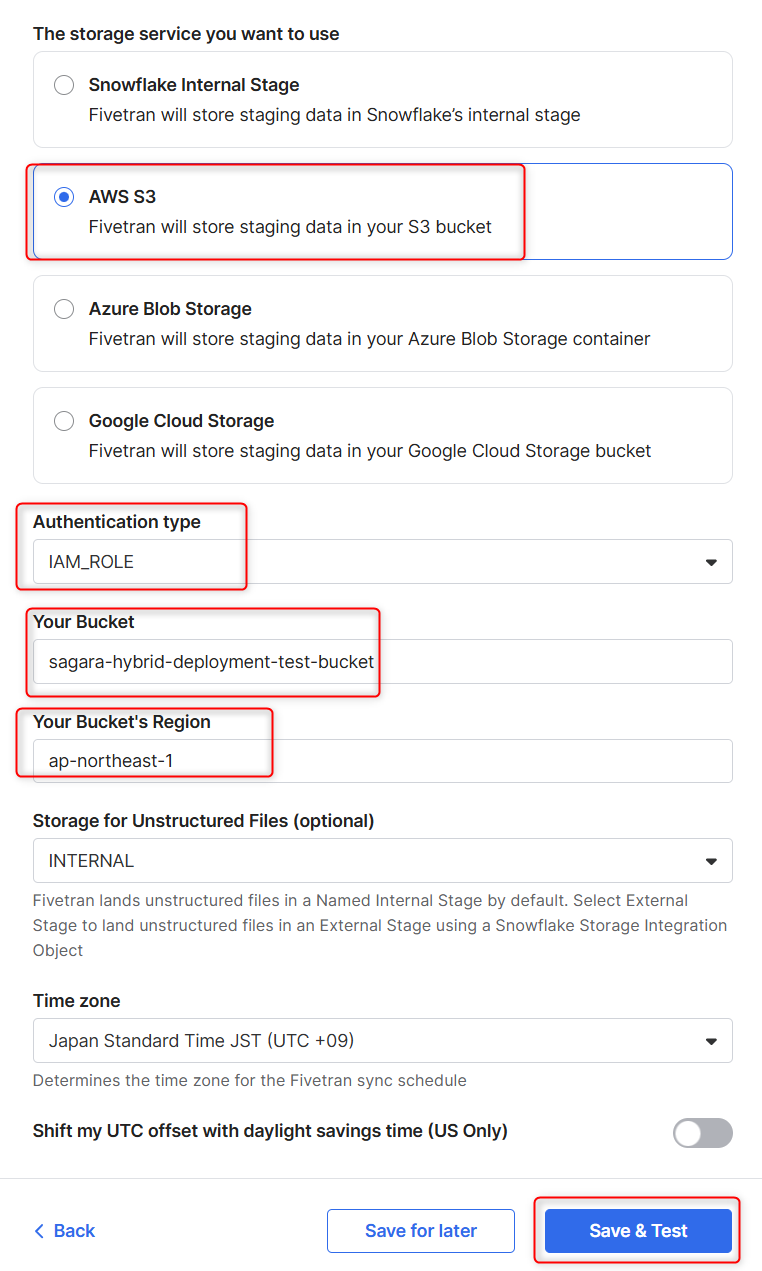
下図のように表示されれば、接続成功です!
Aurora PostgreSQLに対するコネクタの設定
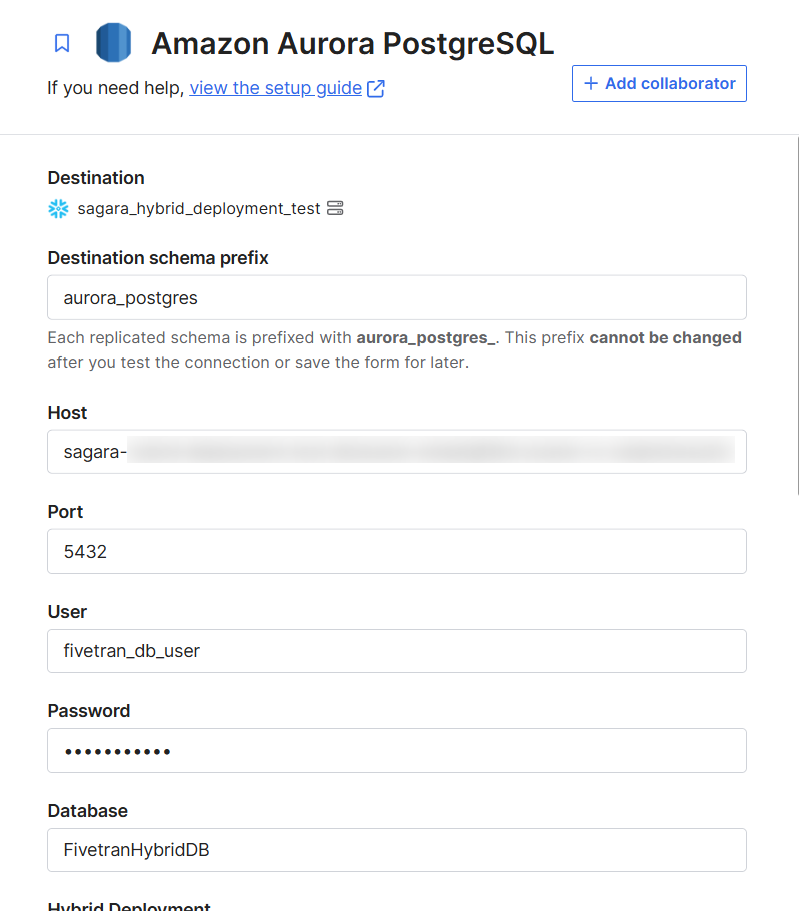
次に、Aurora PostgreSQLに対するコネクタの設定を行います。
Connectionを追加する画面で、Aurora PostgreSQLを選択します。

Destinationは、先程設定を行ったHybrid DeploymentのDestinationを設定します。
Host名など、各種設定値を入れます。
Select an existing agentでは、作成したエージェントを指定します。
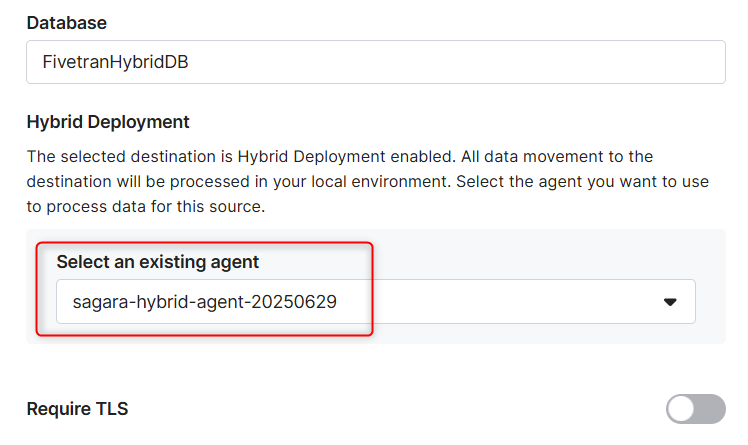
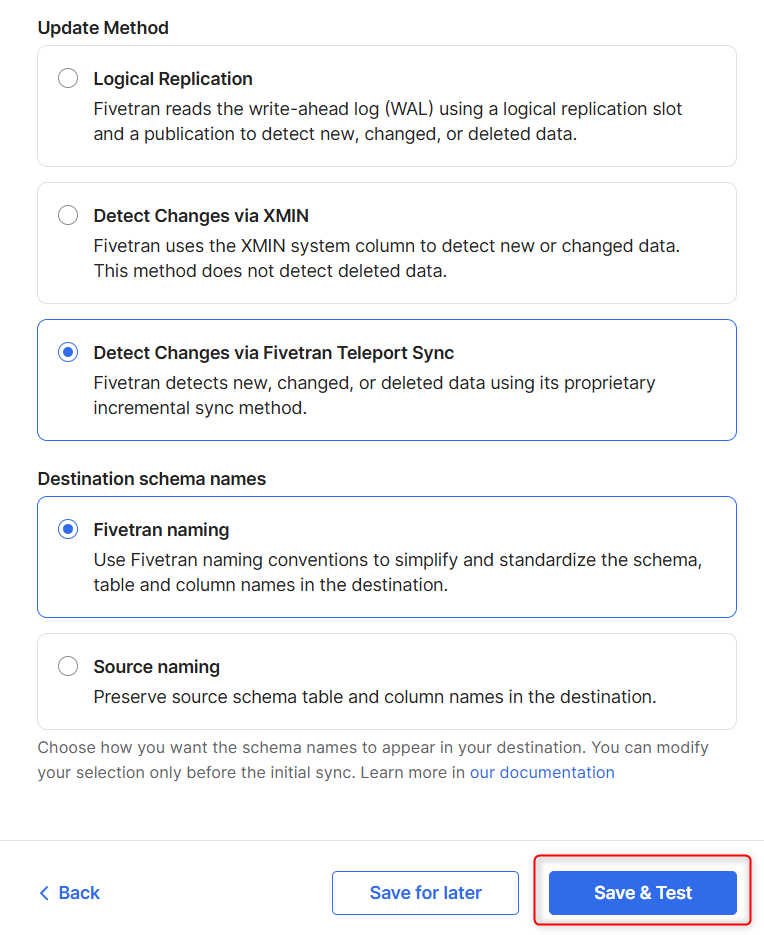
Update MethodはTeleport Syncを選択し、Save & Testを押します。
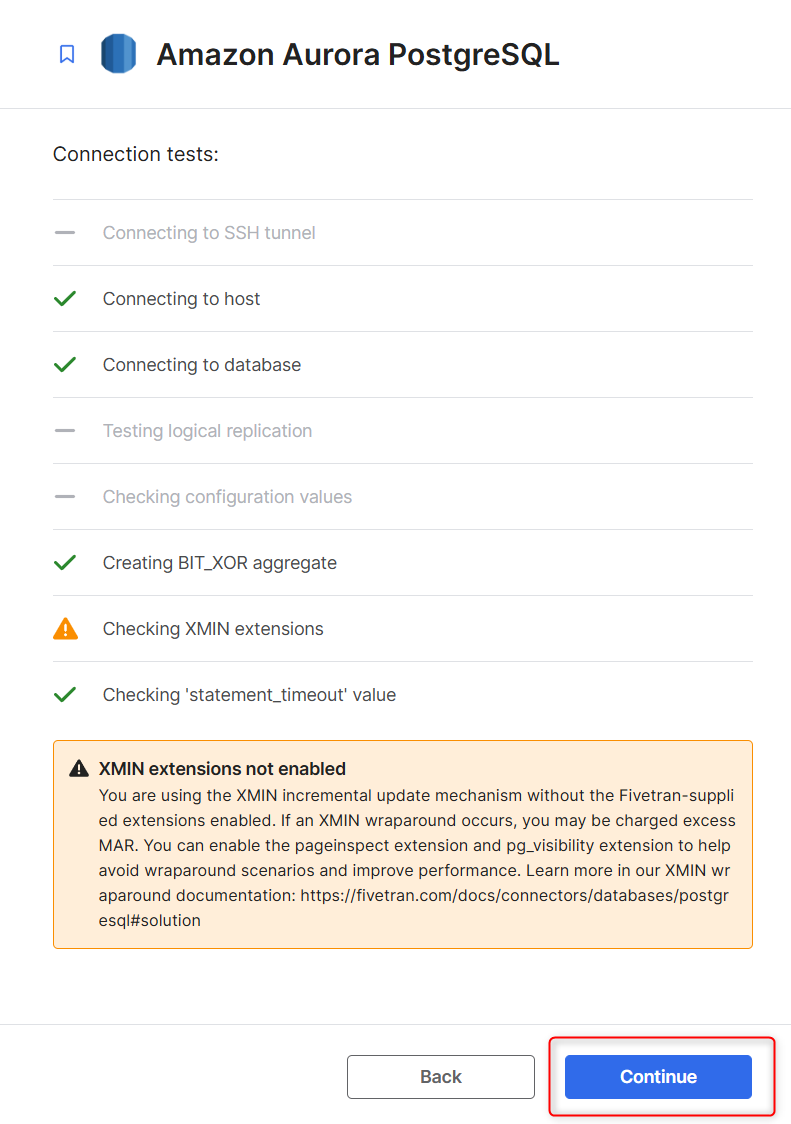
1つ警告が出ていますが、今回の検証の範囲外のためスルーしてContinueを押します。
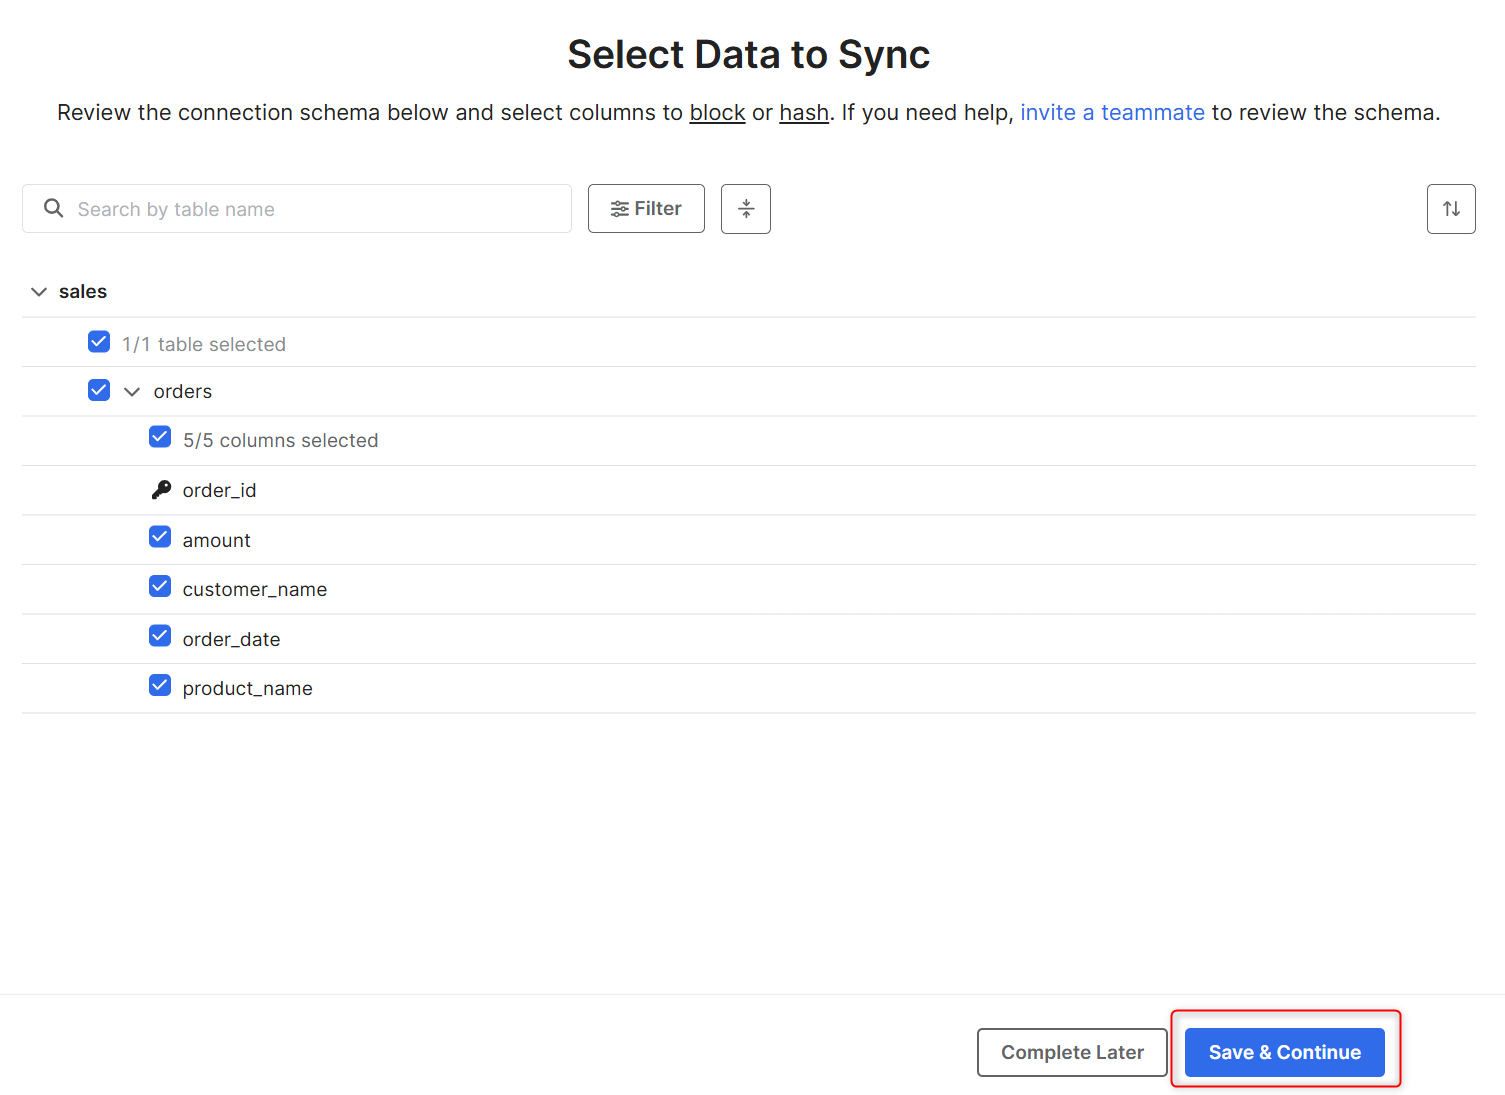
スキーマの検知が終わったら、Syncさせたいテーブルとカラムを選び、Save & Continueを押します。
初回Sync実行
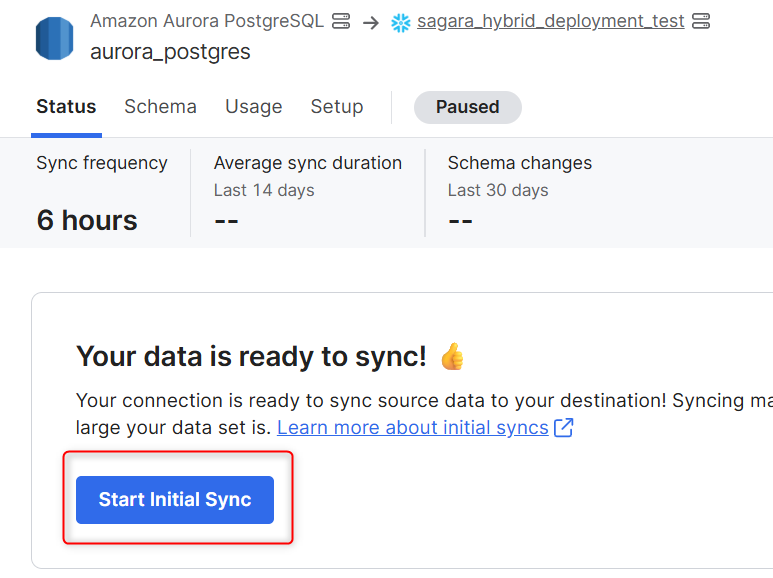
コネクタの設定が完了したので、初回Syncを実行します。
コネクタの画面で、Start Initial Syncを押します。
一定時間経過後、Snowflakeで対象のデータベースとスキーマを確認すると、無事にSyncされていました。
Aurora PostgreSQLのデータを更新し、2回目の実行
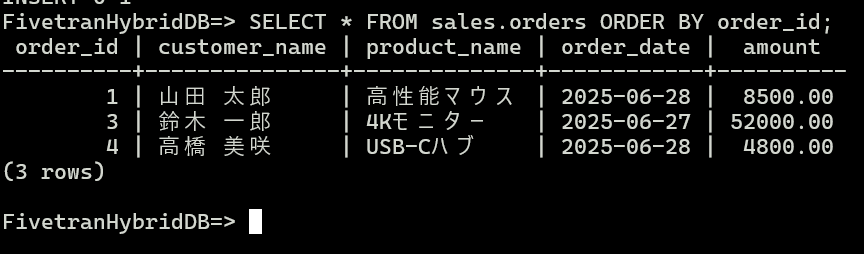
念の為、Aurora PostgreSQL上でデータを更新して、もう一度Syncを行ってみます。
Aurora PostgreSQL上で以下のクエリを実行します。
UPDATE sales.orders
SET amount = 52000.00
WHERE order_id = 3;

DELETE FROM sales.orders
WHERE order_id = 2;

INSERT INTO sales.orders (customer_name, product_name, order_date, amount)
VALUES ('高橋 美咲', 'USB-Cハブ', '2025-06-28', 4800.00);

SELECT * FROM sales.orders ORDER BY order_id;
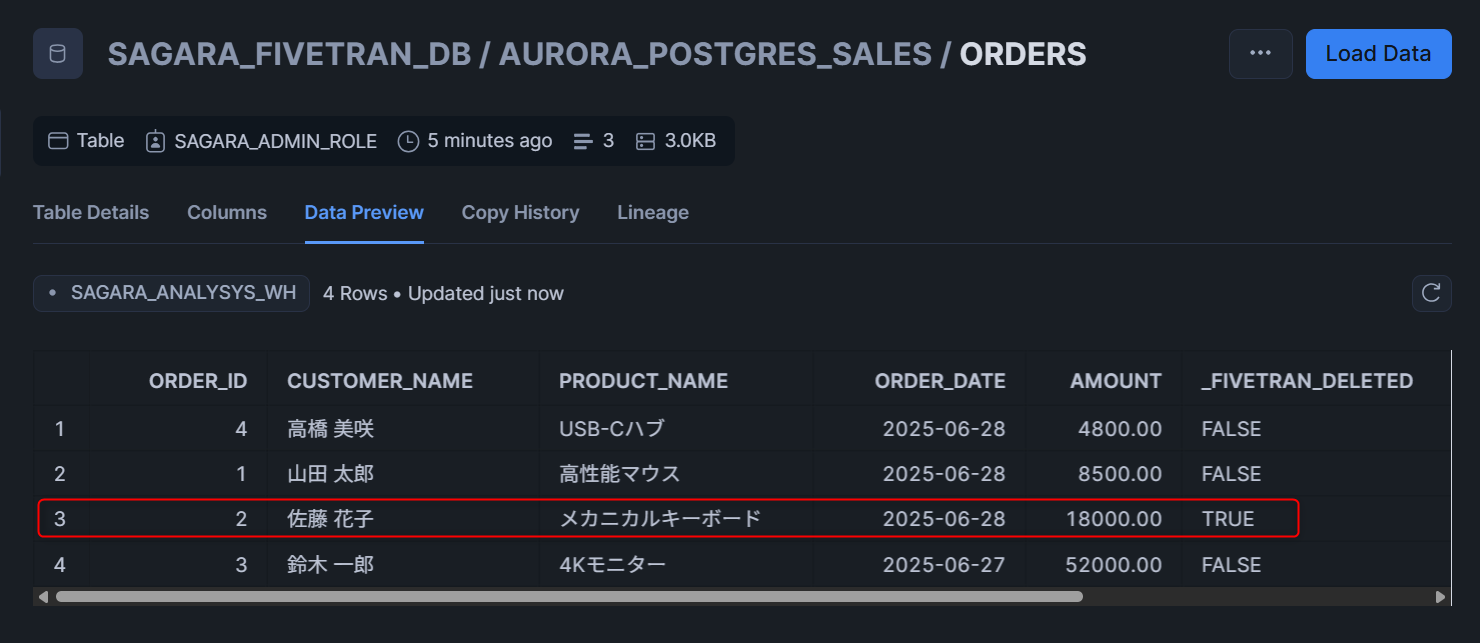
この後、FivetranのUI上で手動Syncを行うと、Snowflake上のテーブルも正しく更新されていました!_FIVETRAN_DELETEDでAurora PostgreSQL上では物理削除されたレコードもSnowflakeでは論理削除されていることがわかります。
最後に
検証用リソースをCloudFormationで作成してFivetran Hybrid Deploymentを試してみました。Dockerのルートレスモードでのインストールには正直かなり躓いたのですが、なんとか形にすることができました。
Hybrid Deploymentのエージェントが行うインターネットとの通信はアウトバウンドだけ許可をすればよいので、閉じたネットワーク内のデータベースをクラウドDWHに同期させるにはピッタリの機能だと思います!ぜひ、お試しください。